 Save
Save I discovered this recipe by accident on a late-night craving when my pantry was running low but my appetite was running high. Standing in front of the cabinet, I spotted those little ramen packets and thought, why not make something ridiculous? The moment those crispy noodle buns came out golden and crunchy, with melted cheese pooling inside, I realized I'd stumbled onto something special. It's the kind of dish that shouldn't work but absolutely does, turning two humble ingredients into something that tastes like you put real effort in.
My roommate came home just as I was pulling the second batch from the skillet, and the smell of butter and melted cheese hit him the moment he opened the door. He watched skeptically until I handed him a piece, still steaming, and saw his expression shift from confusion to genuine delight. That's the moment I knew this wasn't just a late-night experiment anymore.
Ingredients
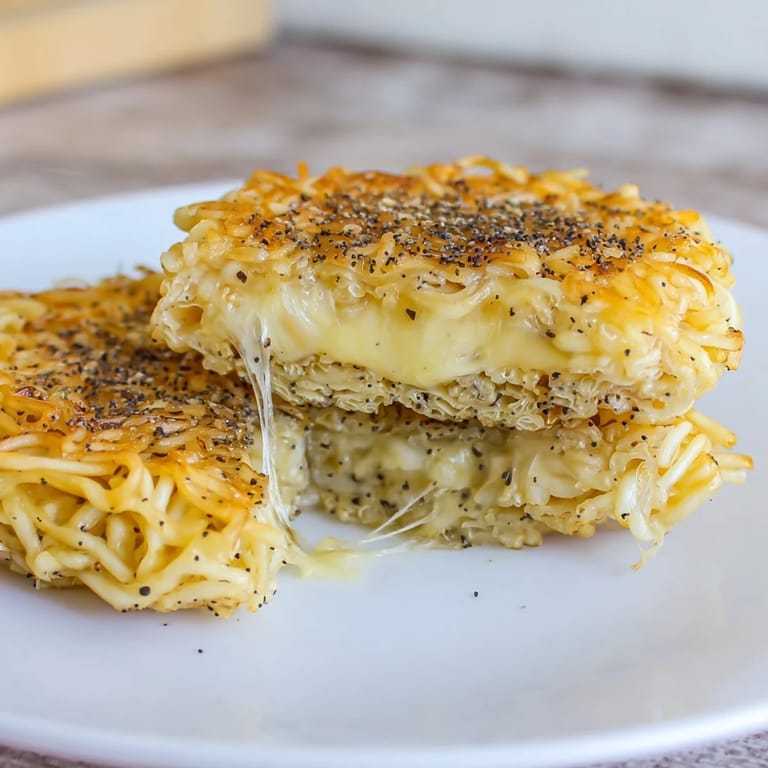
- Instant ramen noodles (2 packs, 3 oz each): The base that becomes your bun—cook them until just tender, drain thoroughly, and discard those seasoning packets so the cheese can shine.
- Large eggs (2): The binder that holds the noodles together without making them heavy or soggy.
- Black pepper and garlic powder (1/4 teaspoon each): A whisper of seasoning that adds depth without competing with the cheese.
- Shredded mozzarella and cheddar (1 cup each): Mozzarella melts silky smooth while cheddar adds sharp flavor and color, but honestly use what makes you happy.
- Unsalted butter or neutral oil (2 tablespoons): Keep some extra on hand because you'll need it twice—once for the buns, once for the assembly.
Tired of Takeout? 🥡
Get 10 meals you can make faster than delivery arrives. Seriously.
One email. No spam. Unsubscribe anytime.
Instructions
- Cook and cool the noodles:
- Boil your ramen for 2–3 minutes, drain it well in a colander, and let it sit for a minute to shed excess moisture. You want tender noodles, not mushy ones.
- Mix the binder:
- Beat those eggs with pepper and garlic powder, then fold in your cooled ramen until every strand is coated. This is your edible glue.
- Shape the buns:
- Divide into four equal portions and press each one into a tight patty about the size of a burger bun. A ring mold lined with plastic wrap makes them perfectly uniform, but your hands work fine too.
- Fry the first side:
- Heat your skillet over medium heat with a bit of butter, then place your patties carefully inside and let them sit undisturbed for 3–4 minutes until the bottom turns golden and crisp. Don't move them around or you'll break them apart.
- Flip and crisp:
- Flip gently, add a touch more butter, and cook the other side until it matches the first. Transfer to a plate while you assemble.
- Build the sandwich:
- Layer half your cheese blend on one bun, crown it with another, and press gently so they stick together. This is where the magic happens next.
- Melt and serve:
- Wipe the skillet clean, add more butter, and return your sandwich at medium-low heat for 2–3 minutes per side. Press lightly and watch until the cheese peeks out at the edges—that's your signal it's melted and ready.
 Save
Save The first time a friend took a bite and closed their eyes, I knew the recipe had earned its place in my regular rotation. It's not fancy, it's not pretentious, but it brings genuine joy—and sometimes that's exactly what a meal should be.
Flavor Variations That Work
Once you nail the basic version, the door opens for customization. I've slipped scallions and sriracha inside the sandwich, and the heat cuts right through the richness in the best way. Kimchi is phenomenal if you want something funky and alive, and fresh jalapeños add a crisp snap that keeps things interesting. The cheese is flexible too—Gruyère brings nuttiness, provolone adds a subtle tang, and fontina makes everything taste a little more refined without any extra effort.
What to Serve Alongside
These sandwiches love company but don't need much. A warm bowl of tomato soup is the classic pairing, turning this into comfort food that feels like a hug. A light side salad with sharp vinaigrette cuts through the richness beautifully, and honestly, pickles or pickled vegetables add a brightness that makes you want another bite. Some people dip theirs in a little sriracha mayo, which sounds simple until you try it.
Storage and Reheating Tips
Leftovers stay good in the fridge for two days, wrapped tightly so they don't dry out. Reheat gently in a skillet over medium-low heat with a touch of butter, giving them 2–3 minutes per side—this restores some of that crispy texture without overcooking the cheese. You can even assemble them the night before, refrigerate, and cook in the morning for a faster breakfast-lunch hybrid.
- Don't use pre-shredded cheese if you can help it because anti-caking agents make it clump rather than melt smoothly.
- Keep your skillet at medium or medium-low heat during assembly so the outside crisps without the inside staying cold.
- A light press with your spatula while cooking helps the cheese melt faster and the buns bond better.
 Save
Save This recipe reminds me why I love cooking—it takes ingredients everyone has and turns them into something that makes people smile. Make it when you want something quick, delicious, and just a little bit clever.
Recipe FAQ
- → How do I make ramen buns hold together?
Mix cooked ramen with beaten eggs and seasonings, then press firmly into patties before frying to help them maintain shape.
- → What cheeses work best inside this sandwich?
Mozzarella and cheddar melt beautifully, but Gruyère, provolone, or fontina are excellent alternatives for rich flavor.
- → Can I add extra flavors to this dish?
Adding scallions, sriracha, or kimchi inside the sandwich provides a spicy, savory boost that complements the creamy cheese.
- → What cooking method ensures crispy buns?
Pan-frying the ramen patties in butter or oil on medium heat until golden on both sides creates a crunchy texture.
- → Is this suitable for a quick meal?
Yes, total preparation and cooking take under 30 minutes, making it a fast and satisfying option.