 Save
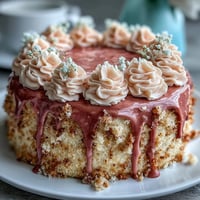
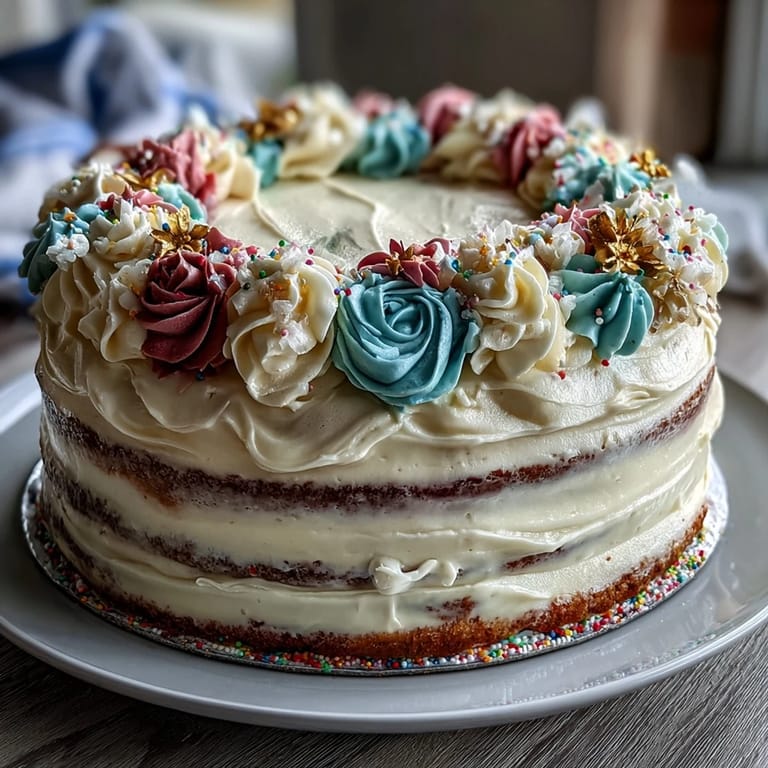
Save My friend Sarah texted me three weeks before her graduation asking if I could make her a cake—not just any cake, but something that captured both her stubborn Taurus energy and the wild accomplishment of finishing her degree. I'd never attempted floral piping before, but watching her face when she saw those delicate buttercream flowers cascading down the layers made every wobbly petal worth it. There's something magical about a cake that celebrates who someone is and what they've earned.
I remember standing in my kitchen at midnight, the day before the party, wondering if I'd bitten off more than I could chew with three cake layers and all those flowers. But as I piped the last leaf and stepped back to look at the whole thing, something clicked—it wasn't about perfection, it was about effort and love showing up in buttercream form. The moment Sarah's friends crowded around the table and started taking photos, I knew why people become obsessed with decorated cakes.
Ingredients
- All-purpose flour (2 1/2 cups): This is your cake's backbone, and measuring it correctly makes the difference between a dense brick and something that actually rises—I learned to spoon it into the measuring cup and level it off rather than scooping straight from the bag.
- Baking powder (2 1/2 tsp): Don't skip this or reduce it thinking you're being clever; it's what gives you those three gorgeous, evenly risen layers.
- Salt (1/2 tsp): A tiny pinch that somehow makes the vanilla sing louder than it has any right to.
- Unsalted butter (1 cup for cake, 1 1/2 cups for frosting): Room temperature is non-negotiable here—cold butter won't cream properly, and you'll end up with a grainy, disappointed cake.
- Granulated sugar (2 cups): This dissolves into the butter to create that light, fluffy crumb that makes people ask for your recipe.
- Eggs (4 large, room temperature): Cold eggs don't incorporate smoothly, so pull them out of the fridge while you're prepping everything else.
- Pure vanilla extract (1 tbsp for cake, 2 tsp for frosting): Spend the extra dollar on real vanilla; it's the difference between cake that tastes generic and cake that tastes like someone cared.
- Whole milk (1 cup, room temperature): The alternating flour-milk method keeps the batter from getting tough, and room temperature milk blends in without shocking the butter mixture.
- Powdered sugar (5 cups, sifted): Sifting takes three extra minutes and prevents tiny lumps that catch on your piping tip—trust me on this.
- Heavy cream or milk (2-4 tbsp for frosting): Start with 2 tablespoons and add more only if your frosting is fighting you; too soft and it'll slide right off the cake.
- Gel food coloring in floral shades: Gel is worth seeking out because liquid coloring thins your frosting and turns your beautiful pink into watery and sad.
- Edible gold leaf or gold sprinkles: Optional but they catch the light in a way that makes people think you're fancier than you actually are.
- Piping bags and assorted tips: A petal tip and a leaf tip are your real MVPs here, though a round tip works fine if you're just starting out.
Tired of Takeout? 🥡
Get 10 meals you can make faster than delivery arrives. Seriously.
One email. No spam. Unsubscribe anytime.
Instructions
- Prepare your pans like you mean it:
- Preheat your oven to 350°F, then grease those three 8-inch round pans and line them with parchment paper—the parchment is the difference between a cake that slides right out and one you're chiseling out in chunks. Three pans bake more evenly than stacking layers, even though it feels like overkill.
- Mix your dry ingredients separately:
- Whisk the flour, baking powder, and salt together in a bowl; this distributes the leavening evenly so you don't end up with a cake that only rises on one side. It feels like an extra step, but it genuinely matters.
- Cream your butter and sugar until it's cloud-like:
- Beat them together on medium speed for 3-4 minutes until the mixture is pale and fluffy—this is where you're incorporating air that will help your cake rise and stay tender. If you rush this or use cold butter, you'll taste the difference immediately.
- Add eggs slowly and deliberately:
- Add each egg individually and beat well after each one so it fully incorporates; rushing this step and dumping all four eggs in at once can cause the batter to curdle and separate. You want a smooth, homogeneous mixture.
- Alternate your dry and wet ingredients:
- Start with flour, then milk, then flour again, always mixing just until combined—overmixing develops gluten and makes your cake tough, which is the opposite of what you want. The moment you don't see streaks of flour, stop.
- Distribute batter evenly:
- Divide the batter among your three pans as equally as possible and smooth the tops slightly; uneven distribution means layers of different thicknesses, which makes frosting and piping a frustrating puzzle. I use a kitchen scale to weigh the batter if I'm feeling particularly precise.
- Bake with confidence:
- Bake for 28-35 minutes until a toothpick inserted in the center comes out clean or with just a few moist crumbs clinging to it. Every oven runs differently, so start checking at 28 minutes rather than assuming 35 is the magic number.
- Cool with patience:
- Let the cakes cool in their pans for 10 minutes, then turn them out onto wire racks to cool completely—this prevents them from steaming in the pans and becoming dense. Trying to frost a warm cake is like trying to frost butter, and it's not a good time.
- Make your frosting frosting:
- Beat softened butter on medium speed until it's creamy and light, then gradually add sifted powdered sugar in batches, beating well between additions. This gradual approach prevents lumps and incorporates air, giving you frosting that's light enough to pipe.
- Add moisture and flavor thoughtfully:
- Mix in vanilla and 2 tablespoons of cream, beating until fluffy—add more cream only if you need to, because you can always add more but you can't take it back. Your frosting should hold stiff peaks for piping.
- Tint your frosting with intention:
- Divide the frosting into bowls and add gel coloring drop by drop until you reach your desired shades; gel colors are concentrated, so a little goes a long way and they won't thin out your frosting like liquid colors. I like to make the colors slightly darker than I think I want them because they lighten when piped.
- Level and stack with structure:
- If your cake layers domed on top, use a serrated knife or cake leveler to create flat surfaces, then place the first layer on your serving plate or cake board. Spread a thin, even layer of frosting (about 1/4 inch) on top, then repeat with the second layer and frosting, then the final layer.
- Apply a crumb coat and chill:
- Spread a very thin layer of frosting over the entire cake—this traps the crumbs—then chill for 20 minutes so it sets. This step is what separates cakes that look polished from cakes that look homemade in an accidental way.
- Finish with a smooth coat:
- Apply your final layer of frosting over the crumb coat, using an offset spatula to create smooth sides and a level top. Work slowly and let the spatula warm up against the frosting so it glides rather than dragging.
- Pipe your flowers like you're telling a story:
- Using your colored frosting and piping tips, pipe petals, leaves, and vines around the cake in whatever design speaks to you—there's no one right way to do this, and happy accidents often look intentional. Start at the bottom and work your way up so you're not smudging flowers you've already piped.
- Add your final flourish:
- If desired, add a Taurus symbol or graduation cap accent using gold leaf or gold sprinkles; these touches transform the cake from beautiful to personally meaningful. Gold catches light beautifully in photographs, which means people will actually remember to take pictures.
- Chill and serve at the right temperature:
- Chill the finished cake until you're ready to serve, but bring it to room temperature before slicing so the frosting isn't rock-hard and the cake releases cleanly from the knife. A warm cake is more forgiving to cut than a cold one.
 Save
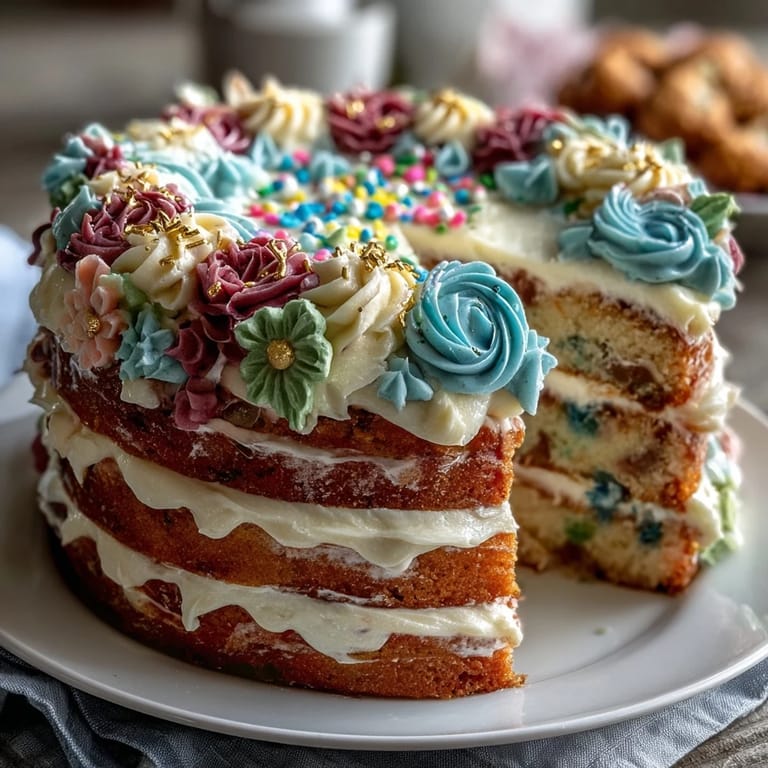
Save There was a moment when Sarah's little brother, who's seven and brutally honest about everything, looked at the cake and said, 'That looks like a garden exploded on it in a good way,' and honestly that's all the validation I needed. Cakes like this aren't really about perfection—they're about showing up for people and making something that says 'I see you and I'm celebrating all of this with you.'
Why Floral Designs Matter for Celebration Cakes
Flowers are the universal language of celebration because they say 'this moment is special' without needing words, and when you pipe them yourself instead of buying a pre-decorated cake, you're adding a layer of personal meaning that supermarket buttercream simply can't touch. I've watched people lean in close to look at hand-piped flowers the way they never do with generic decorations, and that moment of recognition—when they realize you actually made this with your hands—is worth every wobbly leaf.
Personalizing This Cake for Your Specific Celebration
The genius of this cake is how customizable it actually is, which means you can make it feel tailor-made for whoever you're celebrating without changing a single ingredient. Match your frosting colors to school colors for a graduation, the birth month's flower for a birthday, or create an inside joke with flower choices that only make sense to the people you love most.
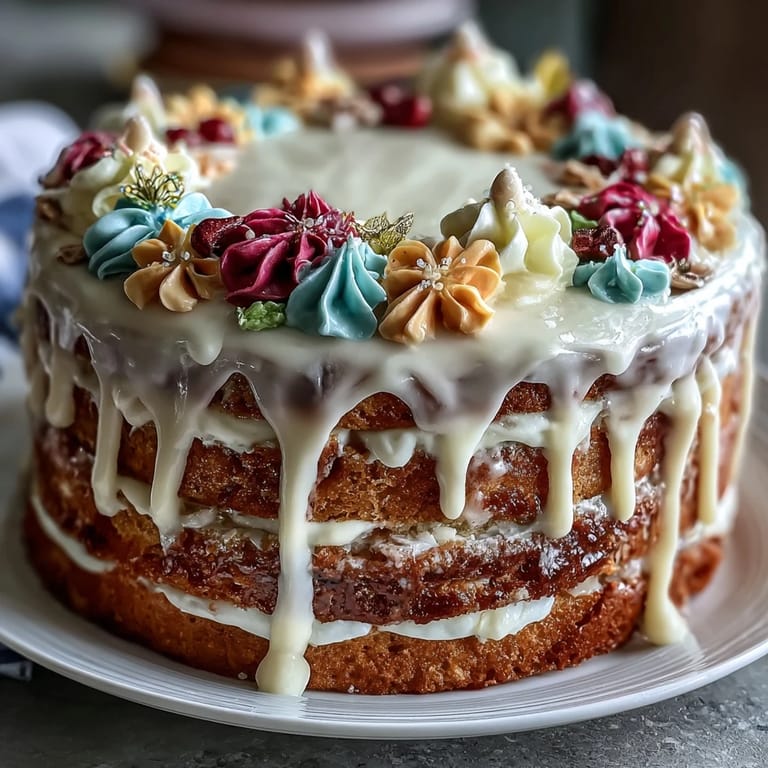
The Secret to Frosting That Actually Pipes Well
The difference between frosting that flows beautifully through a piping tip and frosting that gets stuck or comes out in angry sputters often comes down to one thing: consistency and temperature. I've learned that slightly cool frosting (not cold, just cool enough to firm up) holds its shape better while still being soft enough to pipe, and it's worth making this cake a couple hours before you need to decorate so everything can rest at that perfect temperature.
- If your frosting is too soft, it'll squish out of shape the moment you release the piping bag pressure, so chill it for 10-15 minutes between piping sessions if you need to.
- If your frosting is too stiff, soften it slightly by letting it sit at room temperature for a few minutes or adding another teaspoon of cream, because fighting with frosting that won't move through the tip is deeply frustrating.
- Practice your piping on parchment paper first—flowers piped on parchment can be chilled, loosened with an offset spatula, and transferred to the cake if you want more control and fewer do-overs visible on your final product.
 Save
Save This cake works because it's beautiful enough to feel like a gift and delicious enough that people actually want to eat it, which is the whole point of making a cake in the first place. Celebrate whoever or whatever you're celebrating with a cake that tastes as good as it looks.
Recipe FAQ
- → What is the best way to achieve smooth buttercream for piping?
Beat softened butter until creamy before gradually adding sifted powdered sugar. Incorporate vanilla and cream for a fluffy, smooth texture ideal for detailed piping.
- → How do I ensure the cake layers bake evenly?
Use three prepared 8-inch pans, fill them evenly with batter, and bake at 350°F until a toothpick comes out clean, about 28-35 minutes.
- → Can I prepare the floral buttercream decorations ahead of time?
Yes, floral crusting buttercream can be piped onto parchment sheets, chilled until firm, and carefully transferred onto the cake for intricate designs.
- → What optional flavor can enhance the vanilla cake batter?
Adding 1 teaspoon of almond extract to the batter creates a subtle nutty undertone that complements the vanilla beautifully.
- → How can the cake be personalized for different celebrations?
Color the buttercream to match birth month flowers or school colors, and add accents like edible gold leaf or sprinkles shaped as Taurus symbols or graduation caps.