Save
Save I discovered this cake on a grey afternoon when my neighbor dropped off a bag of homemade candied oranges, their syrupy sweetness filling my kitchen with an unexpected brightness. She'd mentioned offhand that they'd pair beautifully with almond flour, and something about that combination—the Mediterranean warmth of olive oil meeting the delicate nuttiness of almonds—wouldn't leave my mind. By evening, I'd sketched out a cake that felt both elegant and effortless, the kind of dessert that tastes like you've been cooking all day when really it's just good timing and decent ingredients.
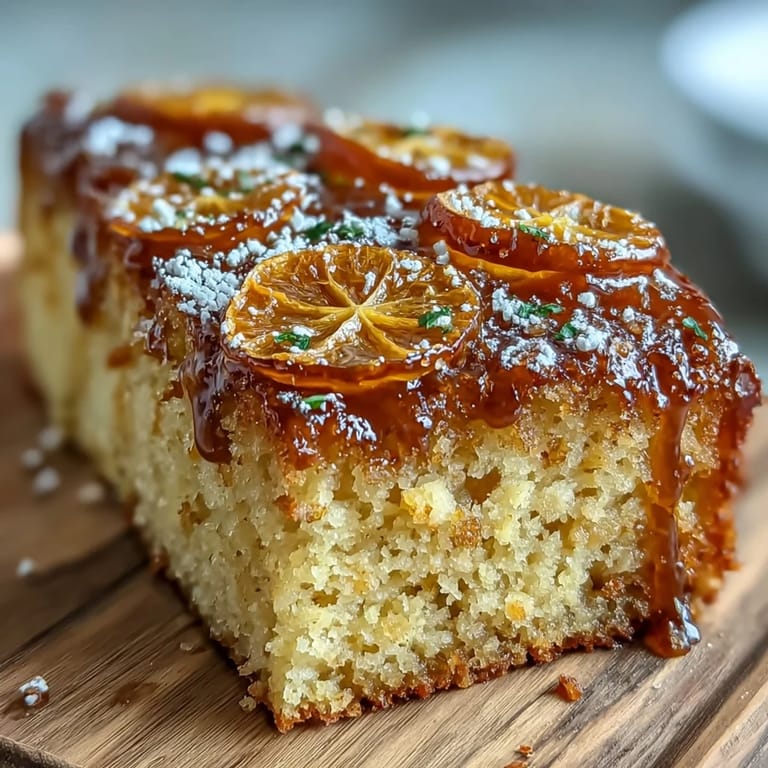
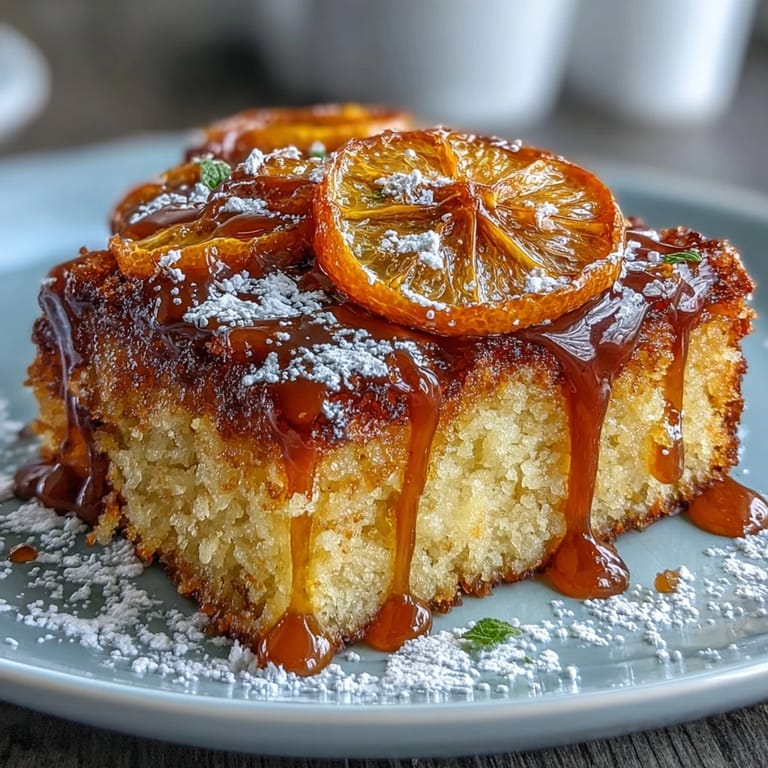
I baked this for my in-laws last spring, nervous about whether the flavor profile would land with them. The moment the cake came out of the oven and I inverted it onto the serving plate, those candied orange slices caught the light like small stained-glass windows, and everyone went quiet for just a second. That quiet told me everything—they tasted it before they even sat down, drawn by the smell of citrus and toasted almonds filling the whole dining room.
Ingredients
- Candied Oranges (2 medium oranges, thinly sliced): These form the stunning topcoat of your cake, so slice them as evenly as possible—the thinner and more uniform, the more translucent and beautiful they'll become during their gentle simmer.
- Granulated Sugar for Candying (1 cup / 200 g): This dissolves completely into a light syrup that coats the orange slices, so don't skip the stirring at the start or you'll end up with grittiness at the bottom of the pan.
- Water (1 cup / 240 ml): Paired with the sugar, it creates the perfect ratio for gently cooking the oranges until they're translucent and no longer bitter.
- Almond Flour (2 cups / 200 g): This is your structure and your richness all at once—it's finely ground almonds without any added starches, which means it absorbs moisture beautifully and keeps the cake tender even as it cools.
- Gluten-Free Flour Blend (1/2 cup / 60 g): This lightens the dense quality almond flour alone would create, giving you lift without gluten; if you're not avoiding gluten, regular all-purpose flour works just as well.
- Baking Powder (1 1/2 tsp): Your only leavening agent, it needs to be fresh because it's doing all the work of making the cake rise into something tender rather than dense.
- Salt (1/4 tsp): A small amount that awakens all the other flavors, preventing the cake from tasting one-dimensional or overly sweet.
- Eggs (3 large, room temperature): Bring them out of the fridge at least 30 minutes ahead—room-temperature eggs incorporate more evenly and help create that pale, slightly thickened mixture that traps air for tenderness.
- Granulated Sugar for Batter (3/4 cup / 150 g): This creams with the eggs to incorporate air and adds sweetness without overdoing it since the candied oranges bring their own sugary notes.
- Extra-Virgin Olive Oil (1/2 cup / 120 ml): Use something you actually like tasting on its own—the fruitier and more complex, the more interesting your cake becomes; this isn't the place for cooking-grade oil.
- Plain Greek Yogurt (1/2 cup / 120 ml): It adds moisture, tang that balances sweetness, and creates a tender crumb that stays soft for days; don't use flavored yogurt or it'll compete with the orange.
- Orange Zest (from 1 orange): Use a microplane to get just the colored part without the bitter white pith underneath; this adds brightness that echoes the candied oranges in flavor.
- Vanilla Extract (1 tsp): A small amount that grounds the citrus flavor and makes everything feel complete without announcing itself.
- Powdered Sugar (for dusting, optional): A light final dusting creates contrast with the golden candied oranges and adds a delicate sweetness that complements without overwhelming.
- Fresh Mint Leaves (for garnish, optional): They add a cool herbal note and visual brightness that makes the whole presentation feel intentional and fresh.
Tired of Takeout? 🥡
Get 10 meals you can make faster than delivery arrives. Seriously.
One email. No spam. Unsubscribe anytime.
Instructions
- Candy the Oranges First:
- Combine sugar and water in a medium saucepan and bring it to a simmer over medium heat, stirring until the sugar completely dissolves—you want that syrup absolutely clear before the oranges go in. Add your orange slices in a single layer and let them bubble gently for 20 to 25 minutes, turning them once or twice so they cook evenly, until they turn translucent like little glass windows and smell concentrated and sweet. Transfer them to parchment paper to cool; they'll firm up slightly as they cool and the syrup clings to them.
- Prepare Your Pan and Heat:
- While the oranges cool, preheat your oven to 350°F (175°C) and get a 9-inch round pan ready by greasing it well and lining the bottom with a circle of parchment paper. This double protection means your cake will release cleanly and you'll be able to invert it to show off those candied oranges on top.
- Layer In the Candied Oranges:
- Once they're cool enough to handle, arrange your candied orange slices on the bottom of the prepared pan, overlapping them slightly like roof shingles if you need to make them fit. They'll stick a bit to the pan, and that's exactly what you want—they'll bake into the cake and stay put when you invert it.
- Combine the Dry Ingredients:
- In a large bowl, whisk together almond flour, gluten-free flour blend, baking powder, and salt, breaking up any clumps in the almond flour as you go. This mixture is going to be the foundation of your cake's texture, so take a breath and do this whisking mindfully rather than rushing it.
- Beat the Wet Base:
- In another bowl, beat your room-temperature eggs with granulated sugar using an electric mixer (or a whisk if you're feeling dedicated), aiming for about 2 to 3 minutes until the mixture becomes pale and slightly thickened—you're incorporating air that will become your rise. Then whisk in the olive oil, Greek yogurt, orange zest, and vanilla extract until everything is smooth and well combined, pausing to scrape down the sides if needed.
- Fold Together Gently:
- Pour the wet mixture into the bowl with the dry ingredients and fold them together using a spatula, working slowly and deliberately until just combined—you want to preserve all that air you just whisked in, so stop as soon as you don't see streaks of dry flour anymore. Overmixing at this point is the enemy of a tender crumb.
- Pour and Smooth:
- Transfer the batter carefully over the candied oranges, smoothing the top with a spatula so it's relatively even, though a few bumps don't hurt. The batter will be thick and glossy, almost like wet sand, which is exactly right.
- Bake Until Golden:
- Slide the pan into your preheated oven and bake for 40 to 45 minutes, until a toothpick poked into the center comes out clean or with just a few moist crumbs clinging to it. The cake will smell incredible and the top will be golden brown, maybe with some cracks where it's risen.
- Cool and Invert:
- Let the cake cool in the pan for about 10 minutes—this is important because it firms up enough to hold together when you flip it, but it's still warm enough to release cleanly from the pan. Run a thin knife around the edges if you're worried, then place your serving plate over the top and flip it confidently in one smooth motion, peeling away the parchment to reveal those stunning candied oranges now embedded in the top of your cake.
- Finish and Serve:
- Dust lightly with powdered sugar if you want that delicate sweetness, and scatter fresh mint leaves around for color and a whisper of freshness. Serve at room temperature so the flavors and texture are at their best.
 Save
Save My daughter asked for a second slice before she'd even finished her first, which made me realize this cake does something special—it's elegant enough to feel like you're treating yourself, but comforting enough that it doesn't feel like a guilty pleasure. That balance is what I keep chasing in a dessert, and this one finally nails it.
The Magic of Candying Your Own Oranges
There's something meditative about standing over that saucepan watching the orange slices gradually transform from opaque to translucent, like they're becoming stained glass right before your eyes. The first time I made candied oranges, I kept turning up the heat because I was impatient, and they turned dark and tough—a mistake that taught me that patience is the actual ingredient here. Now I set a timer, turn the heat to medium, and let the gentle simmer do its work while I prep the rest of the cake, trusting that those slices know what they're doing.
Why Greek Yogurt Changes Everything
Using Greek yogurt instead of buttermilk or sour cream keeps this cake lighter and more tender because the thick, strained yogurt adds moisture without heaviness, and its subtle tang cuts through the sweetness in a way that feels sophisticated rather than sour. I learned this accidentally when I ran out of buttermilk one afternoon and grabbed Greek yogurt from the fridge, and the result was so good that I've never gone back. It also means the cake stays moist for days, kept covered at room temperature, which makes it perfect for planning ahead.
Storage, Scaling, and Small Moments
This cake keeps beautifully covered at room temperature for up to two days, and I've found it actually tastes better on day two when all the flavors have had time to settle into each other. If you want to play with flavors, blood oranges create a stunning jewel-toned version, or you could try blood oranges paired with a tiny pinch of cardamom whisked into the batter for something unexpectedly aromatic and warm. For serving, a dollop of whipped cream or thick yogurt alongside a slice transforms it into something you'd order at a café, and a cup of Earl Grey tea beside it feels like the most civilized afternoon ever.
- The cake also freezes beautifully wrapped well—thaw it at room temperature and it tastes almost as fresh as the day you made it.
- If you're doubling the recipe, use two 9-inch pans instead of stacking layers, since this batter rises modestly and you want even baking.
- Always let your eggs come to room temperature and taste your olive oil first; these two ingredients more than any others will determine whether your cake tastes like it came from a bakery or your own kitchen.
 Save
Save Every time I make this cake, I think about my neighbor and her bag of candied oranges, how a small gesture led to something I return to again and again. It's become the kind of dessert I make when I want to feel like I'm taking care of people, and that's really what good food is.
Recipe FAQ
- → How do I make the candied oranges?
Simmer thin orange slices in a sugar and water syrup for 20–25 minutes until translucent, then cool on parchment.
- → Can I substitute almond flour for another flour?
Almond flour provides a nutty flavor and moist texture; substituting will alter these qualities but gluten-free flours can be used.
- → What is the role of olive oil in the cake?
Olive oil adds richness and moisture, contributing to a tender crumb and enhancing flavor depth.
- → How should the cake be stored?
Store covered at room temperature for up to two days to maintain freshness and texture.
- → Can Greek yogurt be replaced with a dairy-free option?
Yes, swapping Greek yogurt for a dairy-free alternative will retain moisture with subtle flavor differences.