 Save
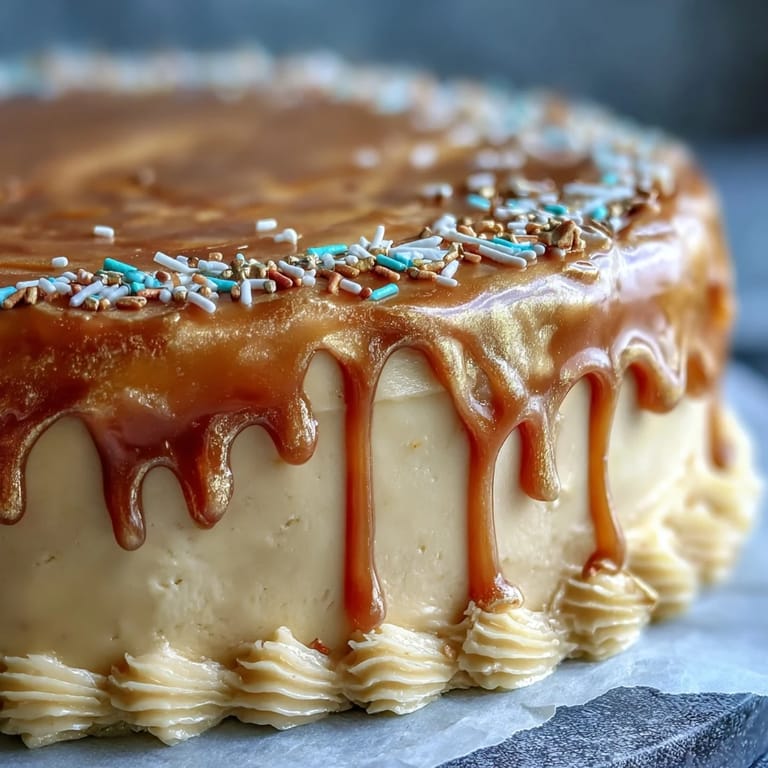
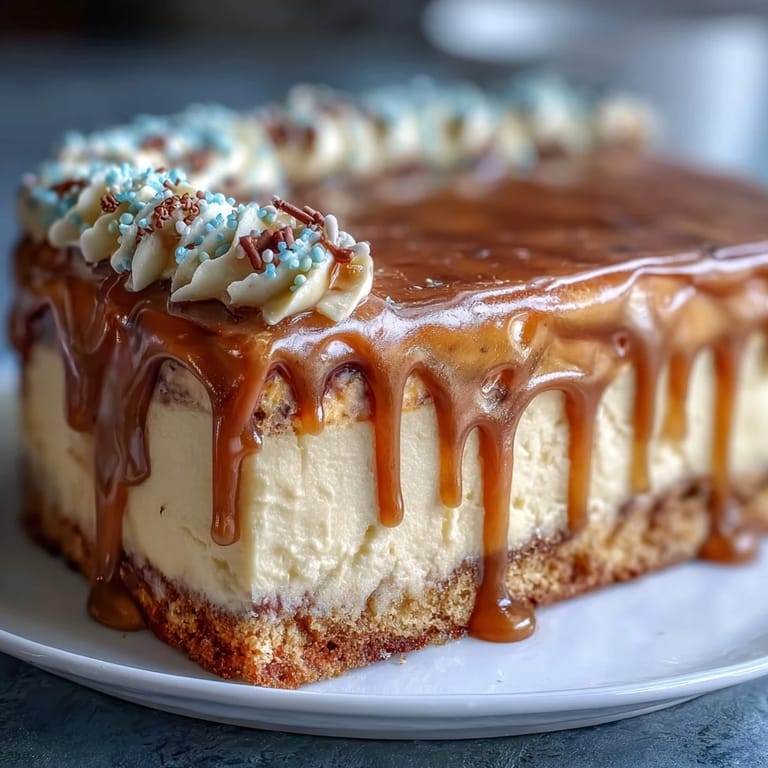
Save There’s something exhilarating about pulling off a cake that's both an edible centerpiece and a personal celebration. The first time I crafted this Gold Drip Graduation Sheet Cake, my kitchen felt oddly festive—even before I started decorating, sugar sparkled everywhere and music played a little louder than usual. I still remember wondering if the gold drip would look as dazzling as promised, and being pleasantly surprised by how easy it was to paint the ganache gold. This cake is all about joyful anticipation, from mixing the batter to placing the mortarboard topper just so. It’s a recipe that turns a milestone into a memory you can slice and share.
The first time I baked this for my cousin’s high school graduation, the kitchen filled with nervous excitement and laughter as we debated whether to add extra gold sprinkles. When she walked in and saw the shiny mortarboard centerpiece, her eyes widened—she barely noticed the banner hanging overhead compared to the cake. Serving it was almost ceremonial; each slice felt like a little piece of pride handed over. Even the quiet guests became chatty when they saw the shimmering edges. That evening, every crumb became as much a part of the celebration as the speeches themselves.
Ingredients
- All-purpose flour: The base for structure, and sifting really lightens the cake—don’t skip it if you want an even crumb.
- Granulated sugar: Sweetness is key and creaming ensures a fluffy texture; I always scrape the bowl, no matter what.
- Baking powder: Essential for lift, triple-check the freshness or your cake may sit flat.
- Salt: Balances with a hint that keeps sweetness from overwhelming.
- Unsalted butter: Softened for easy creaming—if it’s cold, the batter won’t blend as smoothly.
- Whole milk: Binds and moistens, and room-temperature milk gives a silky batter.
- Sour cream: Adds richness and that ever-so-slight tang, making the crumb irresistible.
- Eggs: Room temp eggs create stable structure, plus they mix in so much easier.
- Pure vanilla extract: A splash makes everything taste like celebration—real vanilla is worth it.
- Powdered sugar: Sifted for a smooth buttercream, preventing lumps and crusty bits.
- Edible gold luster dust: Turns a simple drip into a showstopper—make sure to buy edible-grade.
- Fondant or chocolate mortarboard topper: The finishing touch, and if you make it homemade, guests will be amazed.
Tired of Takeout? 🥡
Get 10 meals you can make faster than delivery arrives. Seriously.
One email. No spam. Unsubscribe anytime.
Instructions
- Prep the pan:
- Grease and line a 12x18-inch sheet pan with parchment, smoothing every corner—trust me, this saves trouble later.
- Mix dry ingredients:
- Whisk flour, baking powder, and salt together; the subtle sounds of whisking always calm my nerves before a big bake.
- Cream butter and sugar:
- Beat softened butter and sugar until fluffy—if you hear the mixer’s whirr brighten, you’re on track.
- Add eggs & vanilla:
- Drop in eggs one at a time, mixing well and adding vanilla; watch as it turns smooth and glossy.
- Combine with dry & wet:
- Alternate flour mixture and milk/sour cream into the bowl; gently fold so you don’t lose that airy volume.
- Bake:
- Pour the batter in, smooth the top, and bake until the kitchen smells buttery and a toothpick comes out clean.
- Cool completely:
- Let the cake rest in the pan on a rack so the buttercream won’t slip—patience is worth it.
- Make buttercream:
- Beat butter till creamy, then slowly add powdered sugar, vanilla, salt, and milk until silky; if you taste along the way, don’t be shy.
- Frost:
- Spread a thick, even layer over the cooldown cake—use an offset spatula and admire your handiwork.
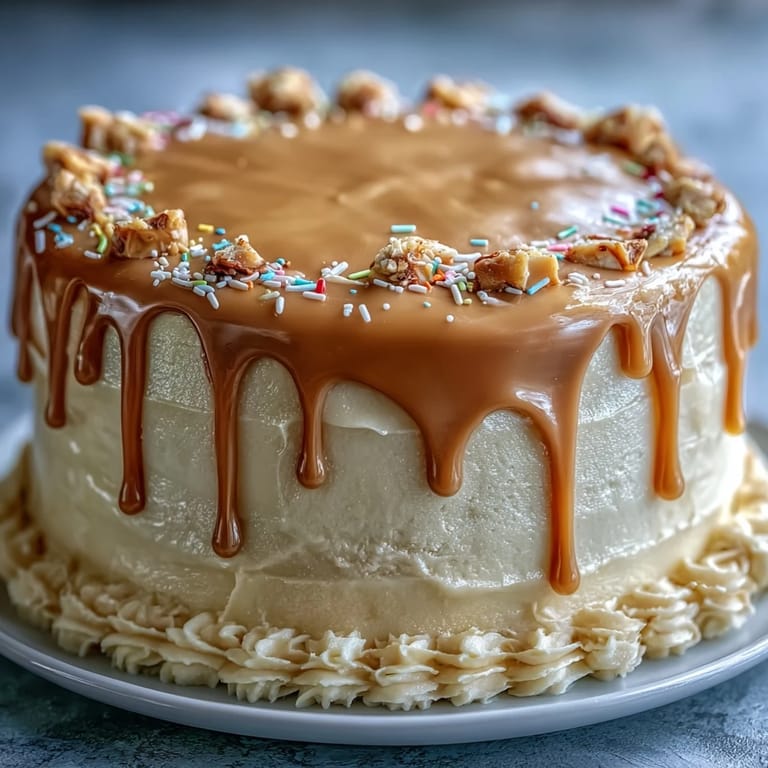
- Prepare gold drip:
- Warm cream and pour it over chocolate chips, then stir smooth and cool just enough to thicken.
- Add drip:
- Drizzle ganache around the edges so it runs in golden rivulets; the first drip always feels magical.
- Paint gold:
- Mix luster dust with vodka or extract and paint over chocolate; a brushstroke transforms the cake instantly.
- Add toppers:
- Set the mortarboard in the center and scatter gold sprinkles—everyone loves the final drama.
 Save
Save When everyone crowded into the kitchen for the group photo beside the cake, I realized how powerful it was to honor hard work with something handmade. Someone spilled a drop of gold paint, and suddenly it became a symbol—not of mess, but of a moment, shining in the midst of real life. That day, we laughed more than usual, and the cake’s golden edge was the star in every snapshot. It was more than dessert—it felt like a trophy. Even days later, reminiscing, the gold shimmer lingered in memory.
Decorating Details that Dazzle
Getting the drip right is all about patience—the ganache must be thick enough to cling, but not too cool or it won’t flow. The edible gold paint can be painted in layers for extra shine, and don’t feel limited by the mortarboard topper: I’ve tucked mini diplomas and even glittery stars on mine for extra flair. If you want a truly polished finish, let each element set fully before adding the next so colors stay crisp. Little imperfections always add character. Decorating this cake genuinely becomes a celebration in itself.
Making the Mortarboard Topper
If you’re making your own topper, fondant and chocolate are both forgiving—cut a neat square, attach a tassel (liquorice works wonders), and try not to stress over symmetry. Store-bought toppers can be a time-saver but handmade versions earn endless compliments. Sometimes I use a toothpick as the anchor, just remember to remove it before slicing. A pinch of edible gold adds pop. Kids love assembling these and it becomes a playful moment in the day.
How to Serve a Sheet Cake Like a Pro
Cutting a sheet cake cleanly comes down to a warm, sharp knife—wipe between slices to keep gold edges sharp and tidy. Serve on large platters to keep the showpiece look, and if crumbs fall while cutting, simply sweep them off for a fresh finish. Leftovers stay moist wrapped well, and the gold paint holds its shimmer for days. Keep extra sprinkles handy for touch-ups before serving. Every slice is a mini celebration.
- If serving outdoors, shade the cake so the buttercream doesn't melt.
- Refrigerate before slicing for smoother pieces.
- Keep decorative toppers for the last moment—they’ll wow guests as they arrive.
 Save
Save This Gold Drip Graduation Sheet Cake celebrates not just achievement but the thrill of making something remarkable at home. Wishing you cheers, laughter, and a masterpiece worthy of every milestone.
Recipe FAQ
- → How do I achieve the gold drip effect?
Combine white chocolate ganache with edible luster dust and a clear extract or vodka to create a shimmering gold finish for the cake's edge.
- → Can I make the mortarboard topper at home?
Yes, use black fondant or chocolate squares and add licorice tassels for an authentic homemade graduation cap decoration.
- → What tools are essential for preparation?
A sheet pan, mixer, offset spatula, parchment paper, food-safe paintbrush, and a piping bag help ensure professional results.
- → Is it possible to add other flavors?
Lemon or almond extracts can be incorporated into the cake batter for a unique twist.
- → Are there allergen concerns I should be aware of?
The cake contains wheat, dairy, and eggs. Always verify decorative materials and toppings for potential allergens.