 Save
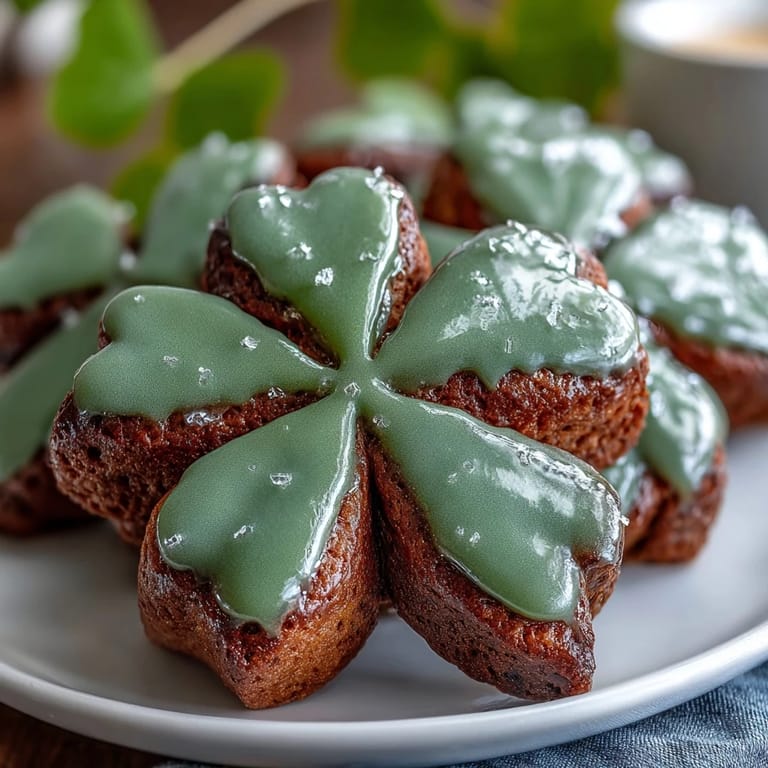
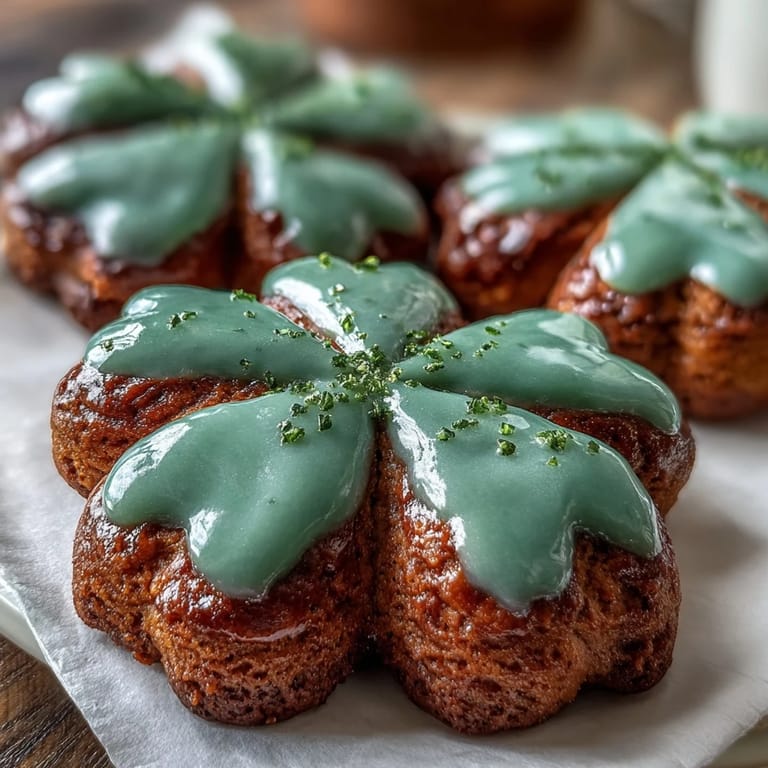
Save Every March, my kitchen fills with the smell of butter and vanilla just as the green decorations start appearing in store windows. Last year, my neighbor stopped by mid-bake and asked if I was making actual shamrocks in the oven, which made me laugh so hard I nearly dropped the cookie sheet. These shamrock sugar cookies have become my go-to for St. Patrick's Day gatherings, not because I have Irish roots, but because there's something joyful about turning simple dough into something that looks festive without trying too hard. The combination of soft cookie and smooth royal icing creates that perfect texture contrast that keeps people reaching for just one more.
I made these for a work potluck once and watched three people take photos before eating them, which felt oddly validating for something I'd mixed up in my pajamas that morning. What surprised me most was how many coworkers asked for the recipe afterward, and then admitted they were nervous about royal icing until I explained it's really just powdered sugar and water with a bit of magic.
Ingredients
- Unsalted butter: The foundation of flavor here, and using softened butter means your mixer won't work twice as hard and you'll get that perfect fluffy base faster.
- Granulated sugar: This creams with the butter to trap tiny air pockets that make cookies tender rather than dense.
- Egg and vanilla: The egg binds everything while vanilla whispers underneath the sweetness in a way that makes people pause and ask what you added.
- Almond extract: Optional but worth trying, it adds a subtle depth that regular sugar cookies often lack.
- All-purpose flour: Measure by spooning into your measuring cup and leveling with a knife, not by dipping straight into the bag, or you'll end up with too much flour and tough cookies.
- Baking powder and salt: These wake up all the other flavors and prevent the cookies from spreading too thin.
- Powdered sugar and meringue powder: Meringue powder is the secret ingredient that makes royal icing set hard enough to stack and package without everything sticking together.
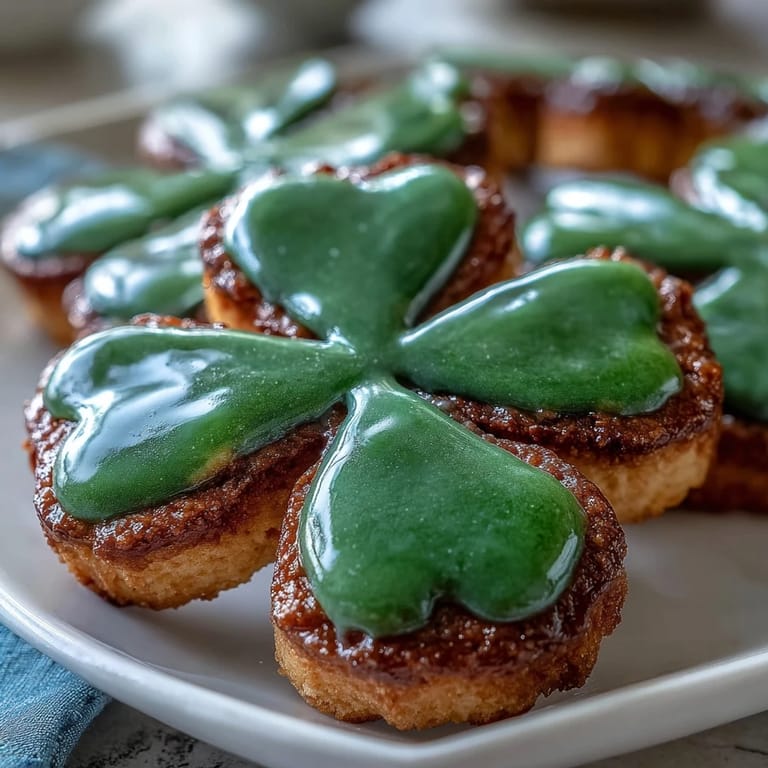
- Green gel food coloring: Gel holds color better than liquid and won't make your icing watery if you want a vibrant green.
Tired of Takeout? 🥡
Get 10 meals you can make faster than delivery arrives. Seriously.
One email. No spam. Unsubscribe anytime.
Instructions
- Cream the butter and sugar until fluffy:
- Beat them together for a full 2 to 3 minutes and you'll notice the mixture go from dense and grainy to pale and almost cloud-like. This step is worth the patience because it's what gives the cookies that tender, melt-in-your-mouth texture.
- Add the wet ingredients:
- Egg and extracts go in next, beating just until you don't see streaks of egg anymore. If you're worried the mixture looks broken or curdled, don't be, the flour will bring everything together.
- Mix in the dry ingredients gently:
- This is where you stop beating and start folding, mixing only until the flour disappears. Overmixing at this stage is the main reason cookies turn out tough instead of tender.
- Chill the dough:
- Flatten it into discs, wrap it, and give it at least an hour in the fridge, though overnight is even better. Cold dough is easier to roll and holds its shape better when baking.
- Roll and cut:
- Flour your surface generously and roll the dough to about a quarter inch thick, which is thin enough to stay crispy at the edges but thick enough to taste substantial. As you cut out shamrocks, place them an inch apart so they have room to spread slightly without touching.
- Bake until just golden:
- Watch for the moment when the edges just barely start turning a pale gold, then pull them out. They'll keep cooking on the hot pan for a few minutes, and pulling them out slightly underdone means they'll stay soft when completely cooled.
- Make the royal icing:
- Combine the powdered sugar, meringue powder, and vanilla, then add water one tablespoon at a time while beating on low speed. You want the icing to form stiff peaks that slowly fall back into the bowl when you lift the beaters, not glossy peaks that collapse immediately.
- Color and pipe:
- Add green food coloring a tiny drop at a time, stirring well between additions, because gel coloring is potent and a little goes a long way. Transfer to a piping bag with a small round tip and outline each cookie first, then fill in the center with icing, letting it naturally settle into a smooth finish.
 Save
Save There's a quiet moment that happens when you finish decorating the last cookie and step back to see them all lined up on the cooling rack, impossibly green and perfectly uniform. That's when baking feels less like a task and more like creating something small and good that makes people smile.
Flavor Variations Worth Trying
The base cookie is sweet and buttery, which means it's a perfect canvas for experimenting. I've swapped the almond extract for lemon zest and the cookies tasted bright and spring-like, which actually felt more fitting for the season than sticking to traditional Irish flavors. Orange zest works beautifully too, adding a subtle citrus note that pairs surprisingly well with the sweetness of the icing.
Decorating Like You Mean It
Royal icing feels intimidating until you realize that imperfection is part of the charm with hand-piped cookies. My first attempt looked wobbly and uneven, but once I stopped comparing it to bakery photos and just focused on making each shamrock look intentional, the decorating became actually fun instead of stressful. The key is working slowly, keeping your piping bag at a consistent angle, and remembering that you can always add sprinkles if a line looks shaky.
Storage and Gifting Strategies
Because royal icing hardens, these cookies keep for almost two weeks in an airtight container, which makes them ideal for baking ahead if you're hosting something. I've learned to layer them between parchment paper so the icing doesn't stick, and I always pack them in a box with a bit of cushioning because the icing is beautiful but brittle. These also make excellent gifts, especially if you package them in a clear bag tied with green ribbon, because the effort looks obvious without being complicated.
- Store in an airtight container at room temperature away from humidity, which is the mortal enemy of royal icing.
- If you need to mail them, wrap each cookie individually in tissue paper and pack them in a sturdy box with packing material.
- Decorate them just before serving or gifting so the icing stays pristine and doesn't pick up any flavors from the container.
 Save
Save Making these cookies is less about perfection and more about enjoying the ritual of baking something festive. Once you make them once, you'll find yourself reaching for this recipe every March after that.
Recipe FAQ
- → What ensures the cookies remain soft after baking?
To keep the cookies tender, avoid overbaking and remove them from the oven as soon as edges begin to turn golden.
- → How is the green color achieved in the icing?
The smooth royal icing is tinted using green gel food coloring, giving a vibrant festive look without altering texture.
- → Can almond extract be substituted?
Yes, lemon or orange zest can be used instead to add a fresh citrus twist to the flavor profile.
- → What tools are needed for shaping and decorating?
A shamrock-shaped cookie cutter is essential for shaping, while a piping bag with a small round tip helps in applying the royal icing details.
- → What makes royal icing suitable for decoration?
Royal icing dries hard, allowing detailed decoration and making cookies perfect for packaging or gifting without damage.
- → Are these cookies suitable for vegetarians?
Yes, they contain no meat products and fit well within a vegetarian diet.