 Save
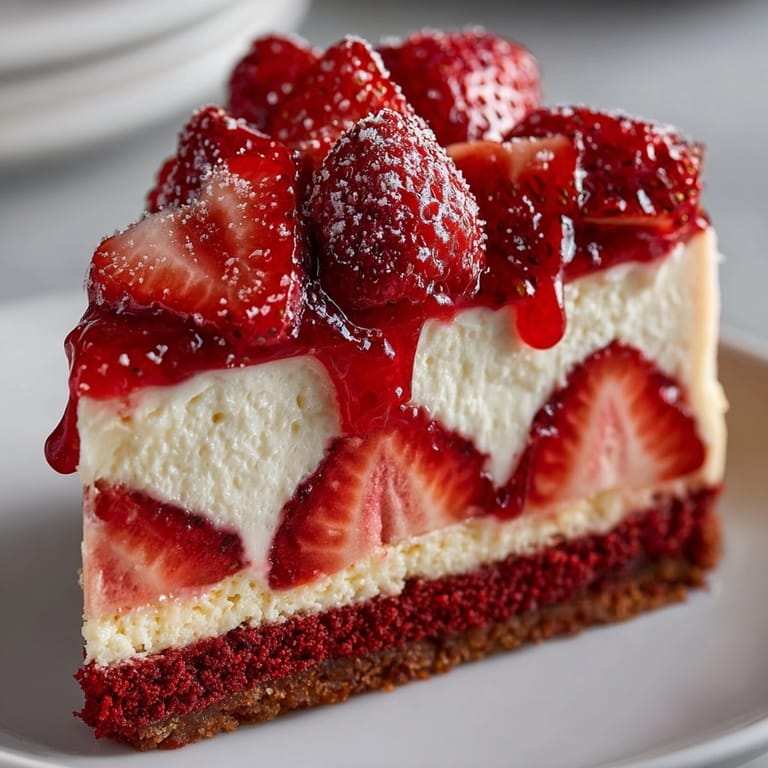
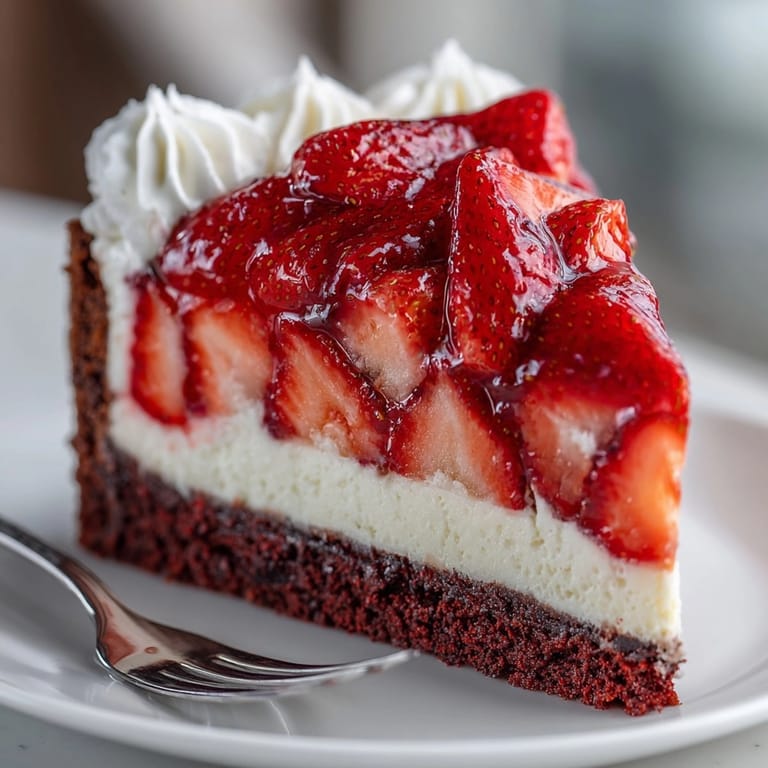
Save This Strawberry Red Velvet Cheesecake blends rich red velvet cake with silky cheesecake and a glossy strawberry crown. Each bite is a celebration of textures, colors, and true dessert indulgence. Whether for birthdays, gatherings, or a sweet escape, this show stopper guarantees smiles and second servings.
The first time I made this, the cake disappeared before I even had a chance to sneak a second piece. Friends begged for the recipe and now it is on every birthday wish list in my family.
Ingredients
- All-purpose flour: provides the structure for a tender cake layer. Use fresh flour for best results.
- Granulated sugar: ensures balanced sweetness and moisture in both cake and cheesecake. Choose fine granules for smoother batter.
- Cocoa powder: adds subtle chocolate undertones. Opt for Dutch-processed if possible for a deep color.
- Baking soda: gives the red velvet base its gentle lift. Make sure yours is active by testing in vinegar.
- Salt: sharpens all the other flavors
- Buttermilk: brings extra tang and moisture. Full-fat tastes richest.
- Vegetable oil: keeps the crumb incredibly soft
- Eggs: in both layers bind the batters and help create that rich, creamy finish. Use large eggs at room temperature for best volume.
- Vanilla extract: builds warmth and complexity. Look for pure vanilla rather than imitation.
- White vinegar: brightens the red color and balances sweetness.
- Red food coloring: gives the base its iconic hue. Gel color is vibrant and does not thin the batter.
- Cream cheese: softens into the dreamiest cheesecake. Let it reach room temperature for a silky filling.
- Sour cream: makes the cheesecake plush and slightly tangy. Best if full-fat for that ultra-creamy effect.
- Fresh strawberries: offer bursts of sweetness and color for the topping. Glossy and plump berries look most dramatic.
- Strawberry jam or preserves: make the quick glaze that settles over the fruit. Pick a jam with a high fruit content and little added sugar.
- Lemon juice: brightens the topping and keeps the berries fresh.
Tired of Takeout? 🥡
Get 10 meals you can make faster than delivery arrives. Seriously.
One email. No spam. Unsubscribe anytime.
Instructions
- Bake the Red Velvet Cake Base:
- Mix the dry ingredients together thoroughly in a large bowl so there are no uneven spots of cocoa or baking soda. This is key to even color and rise. Whisk the wet ingredients until completely blended before adding to the dry mixture. Pour the wet into the dry and stir until just combined to keep the cake layer extra tender. Pour the batter into a parchment-lined springform pan and spread to the edges. Bake until a toothpick comes out with just a crumb or two. Cool completely in the pan before layering. This creates a sturdy foundation.
- Make the Cheesecake Layer:
- With a hand or stand mixer, beat softened cream cheese and sugar until totally smooth and no lumps remain. Scrape the bowl often. Add eggs one by one, mixing slowly to avoid overbeating, which can add air bubbles. Stir in vanilla and sour cream until the mixture is glossy and uniform. Spread this creamy batter over the cooled cake base and smooth the top with an offset spatula. Tap the pan lightly on the counter to release any trapped air for an even bake.
- Bake the Cheesecake:
- Place a deep pan of hot water on the bottom oven rack to make the oven humid. This keeps the cheesecake top from cracking and results in a velvety texture. Bake until the edge is set but the center still jiggles like pudding in the middle. Do not overbake. Cool in the oven with the door propped open. Gradual cooling prevents sinking and cracks. When mostly cool, refrigerate for at least 4 hours to let the flavors marry and the layers firm up for perfect slicing.
- Prepare the Strawberry Topping:
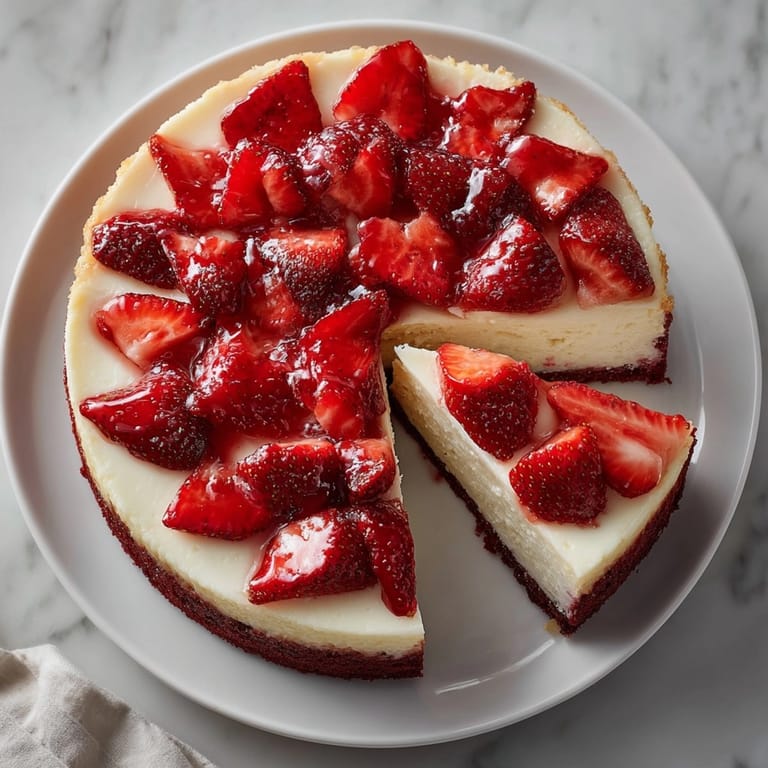
- In a saucepan, melt strawberry jam with lemon juice over low heat. Stir until smooth and fluid. Let it cool slightly to thicken just a bit. Arrange bright sliced strawberries neatly across the chilled cheesecake, starting from the edges and working inward like a fan design. Drizzle the cooled glaze over the fruit for shine and an extra punch of strawberry flavor. The fruit should glisten but not be swimming in syrup.
- Serve and Enjoy:
- Release the chilled cheesecake from the springform and use a long knife dipped in warm water to slice for neat pieces. Wipe the knife between cuts for the best presentation. Serve cold for the creamiest bite. Watch as every layer shines through and gets devoured.
 Save
Save Every time I make this cake, I find myself sneaking extra strawberries for the topping. They burst with juiciness and their brightness pulls all the rich flavors together. My little one loves helping fan out the berries so it feels like a family project every single time.
Storage Tips
Wrap the whole cheesecake securely and chill in the fridge for up to four days. Individual slices can also be wrapped and stored in airtight containers. If you want to keep the berries looking their best, try storing the fruit separately and adding just before serving. This way your topping stays glossy and vibrant.
Ingredient Substitutions
If you are out of buttermilk, use regular milk with a splash of lemon juice stirred in. For a gluten-free option, try a quality one-to-one baking flour. Greek yogurt can replace sour cream in the cheesecake for a slightly tangier bite. Swap raspberry jam for the strawberry glaze if you prefer a twist. For a dramatic effect in the cake base, use beet powder instead of food coloring.
Serving Suggestions
Serve slices chilled either plain or with an extra drizzle of strawberry sauce. For holidays, sprinkle on red or pink edible glitter. Pair with coffee or cold brew for contrast. If you are gearing up for a birthday, add candles and a crown of whipped cream. This cheesecake also makes a beautiful finish to a brunch spread.
Cultural Notes
Red velvet cake first rose to popularity in the American South. Its unique color and flavor come from the reaction between cocoa and acidic ingredients like vinegar and buttermilk. Layering it with cheesecake is a modern twist that has become a favorite at celebrations all over. The strawberry topping gives a nod to classic strawberry shortcake, another crowd-pleaser.
Seasonal Adaptations
Use peak-season local strawberries in the spring for the brightest flavor In winter, try frozen berries gently simmered with jam for a beautiful topping For a summer picnic, turn the recipe into portable cheesecake bars by lining a square pan with parchment
Success Stories
Many readers say the cheesecake disappears in minutes at family reunions. It has become a beloved birthday cake at local bake sales and a must-have for Mother’s Day brunches. Parents note it is a hit with kids for both color and taste. I have seen it steal the spotlight from even the fanciest bakery cakes.
Freezer Meal Conversion
Chill the fully baked and cooled cheesecake then wrap it twice—first in plastic then in foil—before placing in the freezer. Freeze without the strawberries for up to two months. Thaw overnight in the fridge then top with fresh berries and glaze. Slicing before freezing lets you grab a single piece whenever a craving strikes.
 Save
Save This strawberry red velvet cheesecake is sure to become a new family favorite. Each slice is a delight of color and taste—perfect for celebrating any occasion or making an ordinary day extraordinary.
Recipe FAQ
- → How do I prevent cracks in the cheesecake layer?
Place a pan of hot water in the oven to create steam, which helps maintain a smooth, crack-free top.
- → Can I use frozen strawberries for the topping?
Fresh strawberries yield the best texture, but thawed frozen strawberries can be used if well-drained before slicing.
- → How long should the cheesecake chill before serving?
Chill for at least 4 hours, preferably overnight, to ensure clean slices and an even, creamy texture.
- → Can I make the cake base in advance?
Yes, bake the red velvet base a day ahead and store tightly wrapped until ready to continue with the cheesecake layer.
- → What is the best way to glaze the strawberries?
Gently heat strawberry jam with lemon juice, let cool slightly, then drizzle over arranged strawberries for a shiny finish.
- → Can the dessert be frozen?
Yes, freeze the fully cooled and assembled dessert (without strawberry topping) for up to one month. Thaw overnight before topping.