 Save
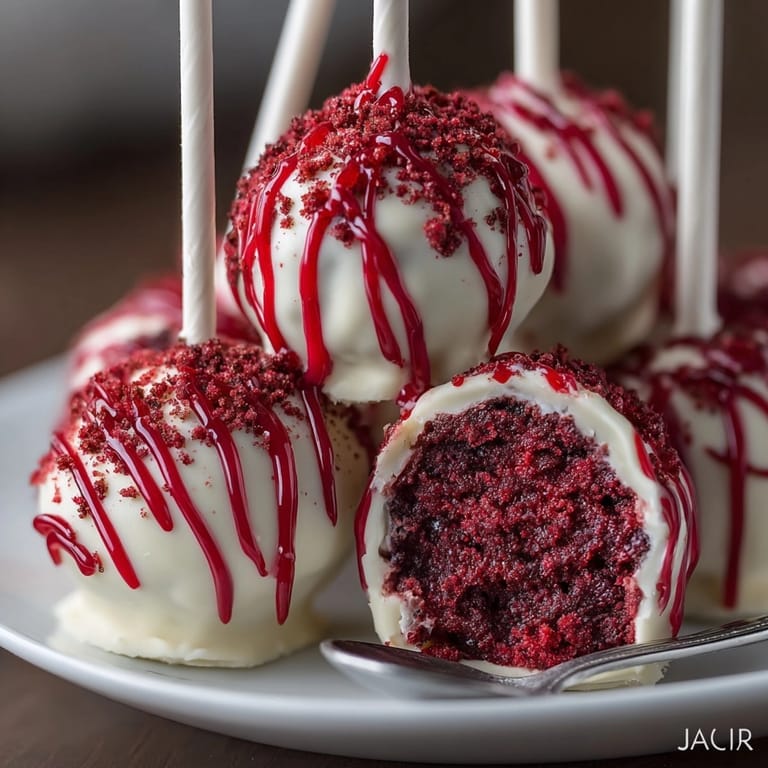
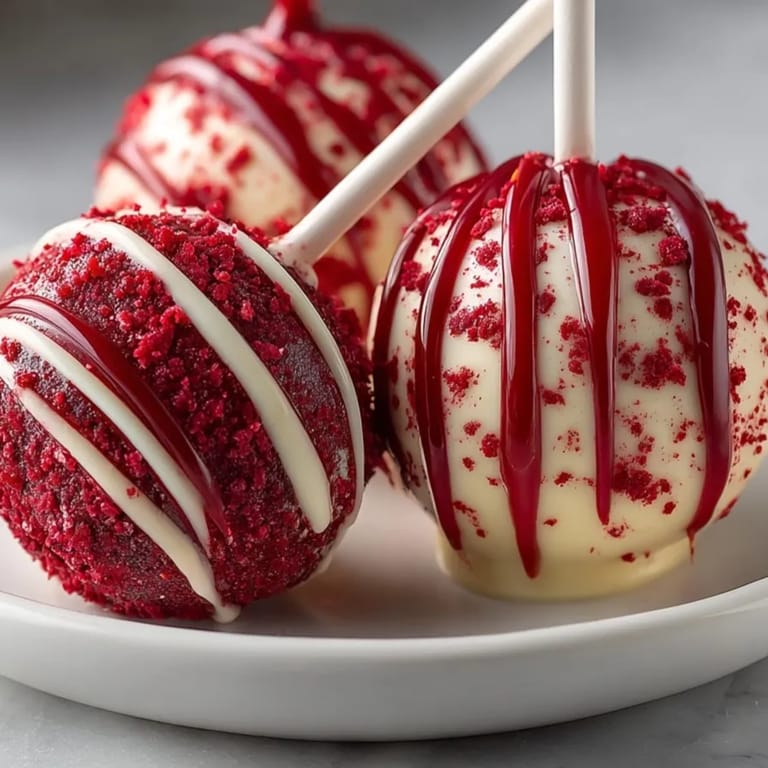
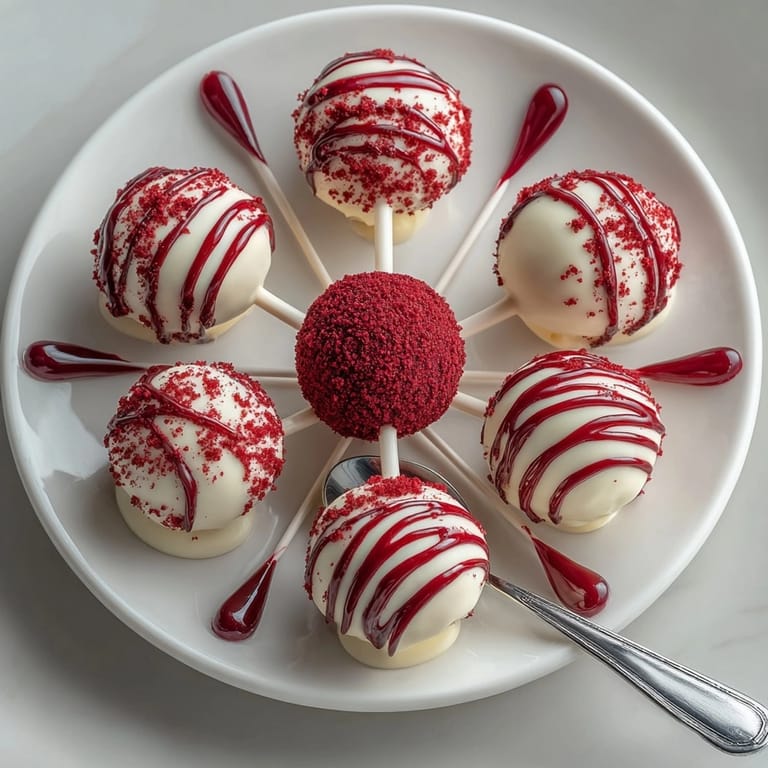
Save These bloody truffle pops are my go-to treat for any eerie celebration. Tender red velvet cake meets tangy cream cheese frosting, all hidden beneath a smooth white chocolate shell. The dramatic raspberry coulis is the delightfully gory finishing touch that makes these pops perfect for Halloween parties or whenever you crave something both playful and decadent.
My first time making these was a last minute decision for my niece’s Halloween sleepover. Watching everyone fight over the last pop definitely made this recipe an instant family favorite.
Ingredients
- All purpose flour: Gives structure and softness to the cake with a fine crumb. Choose unbleached for best flavor.
- Unsweetened cocoa powder: Brings in that signature red velvet flavor. Dutch process will add extra depth.
- Baking soda: Ensures the pops are light not dense by reacting with vinegar and buttermilk.
- Salt: Balances out sweetness and amps up the cocoa. Fine sea salt works well here.
- Unsalted butter: Delivers richness. Soften thoroughly for easy creaming.
- Granulated sugar: Fuels the cake’s tender crumb. Look for superfine for the smoothest texture.
- Eggs: Bind and add moisture for a plush cake. Room temperature eggs mix more evenly.
- Buttermilk: Provides tang and keeps the cake tender. Fresh is ideal for flavor.
- Vanilla extract: Rounds out flavors. Use pure vanilla for best results.
- Red food coloring: Gives the classic bloody hue. Gel produces vivid color with little aftertaste.
- White vinegar: Reacts with baking soda for lift. Clear vinegar keeps the color true.
- Cream cheese and unsalted butter: Blend together for ultra creamy frosting. Soften deeply for effortless mixing.
- Powdered sugar: Thickens frosting without grittiness. Sift if lumpy.
- White chocolate or white candy melts: Melt smoothly for coating. Opt for high quality baking chocolate for best shine.
- Raspberry coulis or jam: Delivers drama and tartness. Use seedless for easiest drizzling.
- Lollipop sticks: Create that truffle pop look and make serving a breeze.
Tired of Takeout? 🥡
Get 10 meals you can make faster than delivery arrives. Seriously.
One email. No spam. Unsubscribe anytime.
Instructions
- Prepare the Cake Batter:
- Combine flour cocoa powder baking soda and salt in a medium bowl and whisk well so all dry ingredients are thoroughly distributed. This prevents dense pockets in your cake.
- Cream the Butter and Sugar:
- Beat softened butter with sugar until pale light and fluffy. This takes around three minutes with an electric mixer. Scraping down the sides gives you an even mixture.
- Add Eggs and Liquid Flavors:
- Beat in eggs one at a time ensuring each is fully incorporated before adding the next. Then pour in buttermilk vanilla red food coloring and vinegar. Mix until smooth and bright red.
- Combine Wet and Dry Ingredients:
- Gradually fold the dry ingredients into wet using a spatula. Mix just until combined to prevent tough pops.
- Bake and Cool:
- Pour the batter into a greased lined cake pan. Bake at 350 degrees for twenty five to thirty minutes. The cake is done when a toothpick comes out clean. Cool completely before handling.
- Crumble the Cake:
- Once cool break the cake into fine crumbs in a clean mixing bowl. Even crumbs blend best with frosting.
- Make the Frosting:
- Beat cream cheese and butter until silky and smooth then add powdered sugar and vanilla. Continue beating until light and creamy.
- Form the Truffle Mixture:
- Mix frosting into cake crumbs gradually until it sticks together but does not get soggy or overly sticky. Knead with clean hands if needed. You may not need all the frosting so add slowly.
- Roll and Chill the Balls:
- Portion mixture into twenty four one inch balls. Place on a lined baking sheet and freeze for thirty minutes to firm them up. This step makes coating easier later.
- Insert Lollipop Sticks:
- Dip one end of each stick into melted white chocolate then push halfway into each chilled truffle ball. Chill again for ten minutes so the stick sets inside.
- Dip and Coat in White Chocolate:
- Melt white chocolate in short thirty second intervals stirring until smooth. Dip each pop in chocolate making sure to cover evenly. Let excess drip before setting pop upright in a styrofoam block or on parchment.
- Decorate with Raspberry Coulis:
- Drizzle or splatter seedless raspberry coulis over set pops for a bloody effect. Let pops set until the coulis dries for a dramatic finish.
 Save
Save Raspberry is my favorite ingredient here. My grandmother always insisted on using real raspberry jam for desserts which inspired the vivid coulis topping. Watching my nephews wield spoons and make a mess every time we decorate these has become one of my favorite kitchen traditions.
Storage Tips
Store finished pops in an airtight container at cool room temperature if serving within a day. For longer storage refrigerate up to five days. Keep pops away from direct sunlight to prevent white chocolate bloom.
Ingredient Substitutions
If you are short on buttermilk you can add a teaspoon of lemon juice to regular milk as an instant swap. Use store bought red velvet cake or frosting when pressed for time. Dairy free white chocolate and vegan butter make these pops suitable for more diets.
Serving Suggestions
Display pops in a pumpkin or skull container for Halloween. For parties hand out individually wrapped pops as favors. You can even add edible shimmer dust for extra spook.
Cultural Inspirations
Red velvet cakes became a Southern tradition as a symbol of celebration. Bringing this classic to Halloween with a bloody raspberry twist is a nod to playful American party culture for all ages.
Seasonal Adaptations
Use dark chocolate coating in winter for cozy richness Add orange zest to cake or coulis for a fall flavor twist Try strawberry coulis in spring for a lighter take
 Save
Save With these spooky truffle pops on hand you will be ready for any Halloween bash or festive movie night. Their bloody raspberry touch is sure to thrill every guest.
Recipe FAQ
- → How do I achieve the dramatic ‘bloody’ look?
Splatter or drizzle raspberry coulis over the white chocolate pops using a spoon or small brush for best effect.
- → Can I use store-bought cake and frosting?
Yes, ready-made red velvet cake and cream cheese frosting can save time and still taste great.
- → How should I store the pops?
Keep decorated pops chilled or freeze undecorated pops up to a month in an airtight container.
- → Is white chocolate required?
No, you can substitute with dark chocolate or candy melts for different flavors and color effects.
- → Are there allergy concerns?
The pops contain wheat, eggs, and dairy. Always check ingredient labels for nut or soy traces.
- → What tools are useful for preparation?
Mixing bowls, electric mixer, cake pan, baking sheet, microwave-safe bowl, popsicle sticks, and a styrofoam block are helpful.