 Save
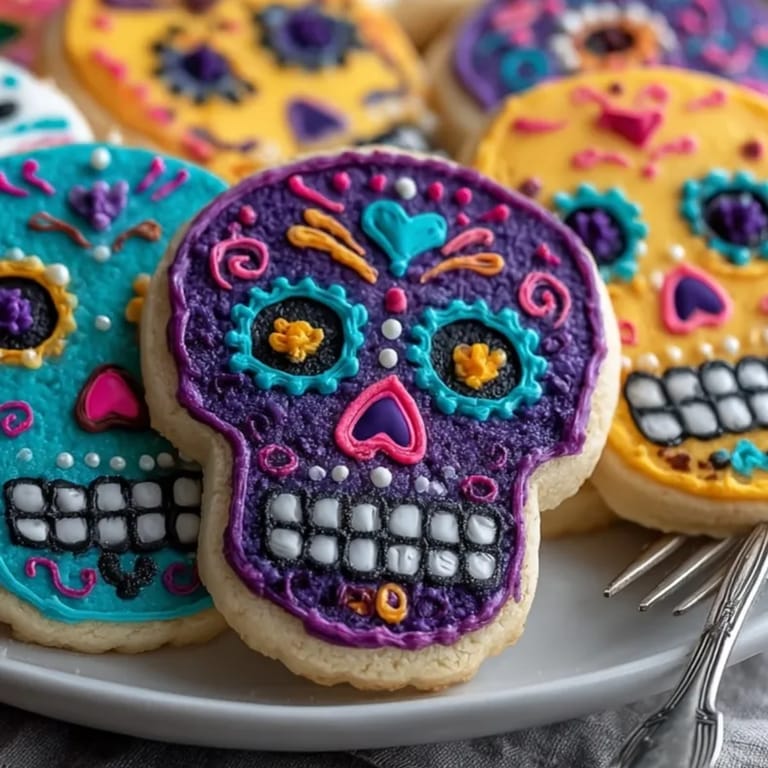
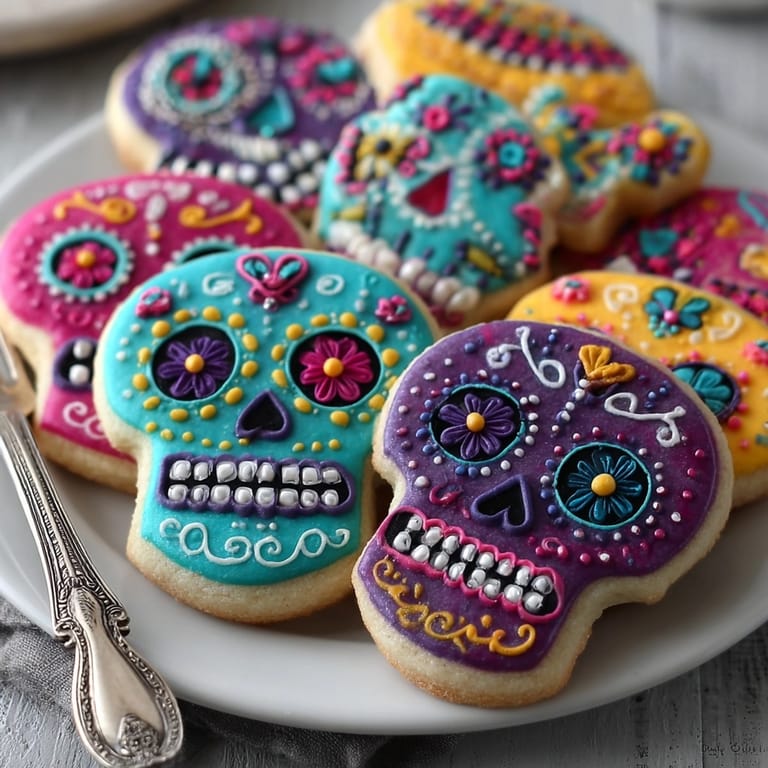
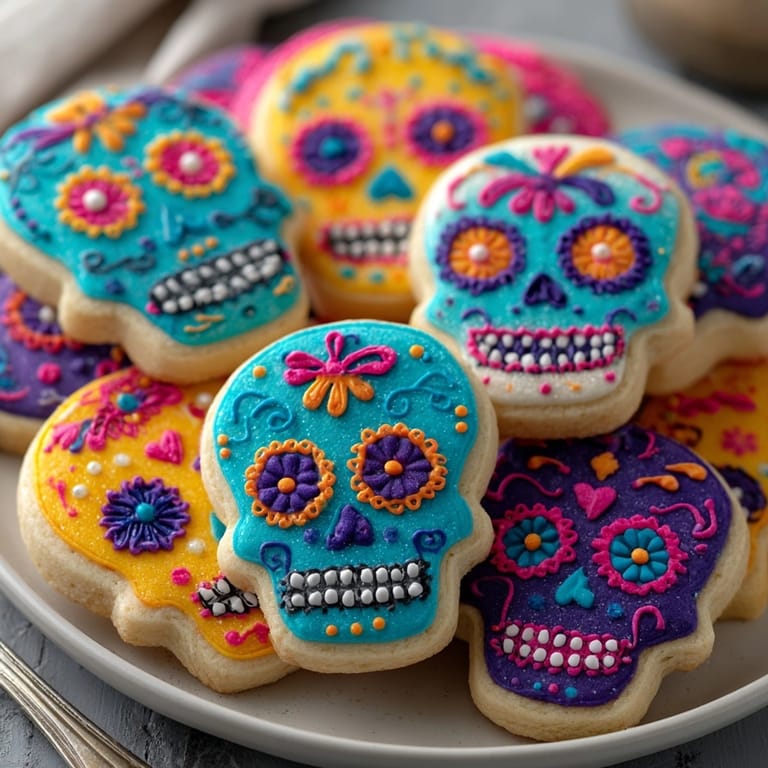
Save These Day of the Dead Sugar Skull Cookies are buttery sweet treats perfect for celebrating Día de los Muertos. Each cookie is a blank canvas for vibrant icing and creative designs echoing the traditional sugar skulls found on family altars during the holiday. Decorating these cookies has become my family's favorite autumn tradition filling the kitchen with color and meaning as we honor the season.
I remember the first time we sat down as a family and got lost in the decorating process. There was laughter some wild icing choices and so much joy seeing everyone's unique skull design.
Ingredients
- All-purpose flour: Ensures a tender cookie that holds its shape during baking Choose a fresh unbleached flour for best texture
- Baking powder: Helps your cookies stay slightly puffy and soft Use a newly opened tin for the best rise
- Salt: Balances the sweetness Choose fine sea salt for even flavor
- Unsalted butter: Brings rich flavor and the perfect tender bite Use butter at room temperature for smooth mixing
- Granulated sugar: The sweet foundation of classic sugar cookies White sugar keeps the dough light-colored and neutral
- Large egg: Binds everything together and helps the cookies bake up sturdy Use the freshest eggs for a richer taste and best texture
- Pure vanilla extract: Deepens flavor and brings warmth Always opt for pure extract instead of imitation for a better aroma
- Almond extract: Adds a delicate nutty note in the background Optional but really brightens the cookies If nut-free skip this and use more vanilla
- Powdered sugar: The magic ingredient for velvety royal icing Sift before using so your icing is lump free
- Meringue powder: Essential for stable royal icing Choose a quality brand for glossy decorating power
- Warm water: Adjusts the icing to a perfect piping consistency Use filtered or bottled water for the cleanest color
- Food coloring gels: Lets you create bold clean colors Look for gel or paste types to avoid thinning your icing
- Assorted sprinkles or edible pearls: Optional but add sparkle and festivity Pick colors to complement your icing hues
Tired of Takeout? 🥡
Get 10 meals you can make faster than delivery arrives. Seriously.
One email. No spam. Unsubscribe anytime.
Instructions
- Make the Cookie Dough:
- Combine the dry ingredients by whisking together your flour baking powder and salt in a medium bowl so everything is evenly distributed. This steps helps create cookies with a tender consistent crumb.
- Cream the Butter and Sugar:
- Beat the softened butter and sugar in a large bowl until pale and fluffy. Take your time this creates air pockets and helps the cookies bake up light with crisp edges.
- Add the Egg and Flavorings:
- Mix in the egg vanilla extract and almond extract until smooth. These bring richness and fragrance to each bite.
- Incorporate the Dry Ingredients:
- Gradually add the flour mixture to the wet ingredients mixing gently and stopping as soon as the flour disappears. Overmixing can make your cookies tough so use a gentle hand.
- Chill the Dough:
- Divide the dough in half and flatten each into a disc. Wrap tightly in plastic and chill for at least one hour. This keeps the cookies from spreading and helps flavors meld.
- Prepare to Bake:
- Preheat your oven to 350°F and line your baking sheets with parchment paper so cookies don't stick. Allow the dough to rest at room temperature for about 10 minutes if it is too firm to roll.
- Shape the Cookies:
- Roll out dough on a lightly floured surface to about one quarter inch thick. Use a skull shaped cutter and transfer each shape gently to your prepared baking sheets spacing about one inch apart.
- Bake:
- Bake cookies for eight to ten minutes watching for edges to turn just barely golden. Cool completely on wire racks will prevent carryover heat from drying the cookies out.
- Make the Royal Icing:
- In a fresh bowl beat together sifted powdered sugar meringue powder and six tablespoons warm water first on low then on high for about five minutes until stiff peaks appear. If icing is too thick add water a little at a time until you get a smooth piping texture.
- Color the Icing:
- Divide icing among several bowls and tint each with bright gel food colorings. Use a clean spoon for each color to keep your hues vibrant.
- Decorate the Cookies:
- Transfer colored icing to piping bags fitted with fine tips. First outline the cookies with white icing and flood the centers allow to set. Next add bright decorative touches flowers hearts swirls and dots to mimic traditional sugar skull designs. Sprinkles or edible glitter may be added if you like. Let cookies dry fully before moving or stacking.
 Save
Save I always look forward to tinting the icing my favorite part is mixing the most vivid purples and blues then seeing how bold they look on the bare cookie canvas. The kitchen feels magical during the decorating process especially when my kids try to outdo each other's designs and we end up with a whole parade of unique skulls.
Storage Tips
Keep cookies in an airtight container at room temperature for up to one week You can freeze undecorated cookies in a zip top bag for a month just thaw and decorate as needed Once decorated allow royal icing to dry completely before stacking or wrapping for sharing
Ingredient Substitutions
Gluten free flour blends work well here but be sure to pick one with xanthan gum for a sturdy texture For eggless or vegan cookies try using vegan butter and replace egg in the dough with a flax or chia egg mixture If almond flavor is not your favorite simply bump up the vanilla or add a little orange zest for something new
Serving Suggestions
Set out these cookies as edible art on your Day of the Dead altar Pair with cups of thick Mexican hot chocolate or café de olla Let kids and adults join in with a decorating party as a memorable gathering activity
 Save
Save These Sugar Skull Cookies blend tradition and creativity into every bite. You get a full afternoon of family fun and celebrate the memories of loved ones in the sweetest way possible.
Recipe FAQ
- → How do I achieve vibrant colors for the icing?
Use gel food coloring, which produces bold hues without thinning the icing. Divide prepared royal icing and tint with small amounts of gel until desired shade is reached.
- → What’s the best way to roll out sugar cookie dough?
Chill dough until firm, then roll out on a lightly floured surface to 1/4-inch thickness. This prevents sticking and ensures even cookies.
- → Can I prepare cookies ahead of time?
Yes, bake cookies a day in advance and decorate when ready. Store undecorated cookies in an airtight container to maintain freshness.
- → How do I prevent royal icing from spreading too much?
Achieve proper icing consistency by adding water slowly. It should be thick for outlining and slightly thinner for flooding cookie surfaces.
- → Are there vegan options for these cookies?
Substitute butter with vegan margarine and use aquafaba instead of egg in royal icing to create a fully plant-based treat.
- → What designs can I create on sugar skull cookies?
Mimic traditional motifs such as colorful flowers, hearts, swirls, and dots. Experiment with sprinkles or edible glitter for extra flair.