 Save
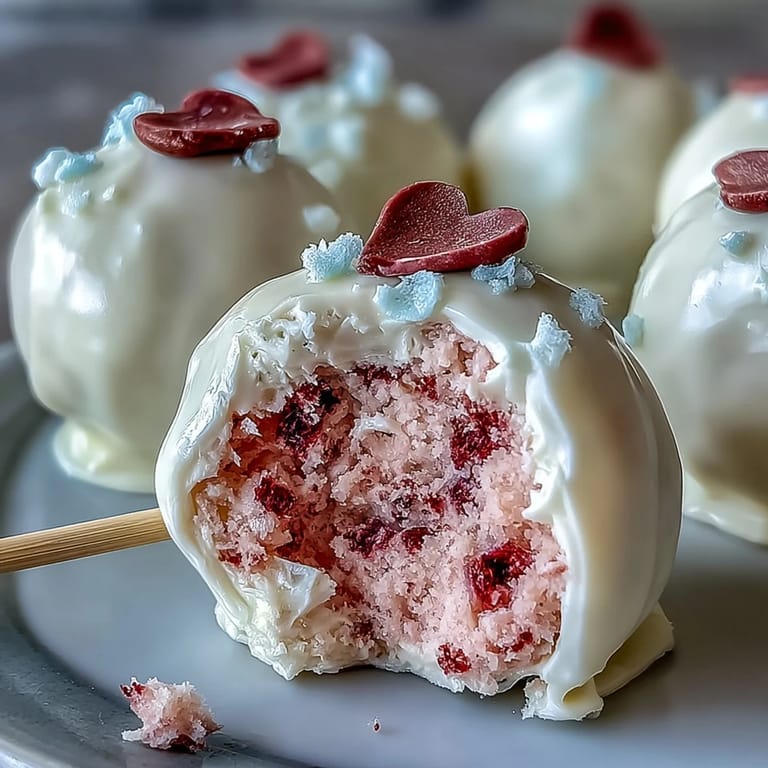
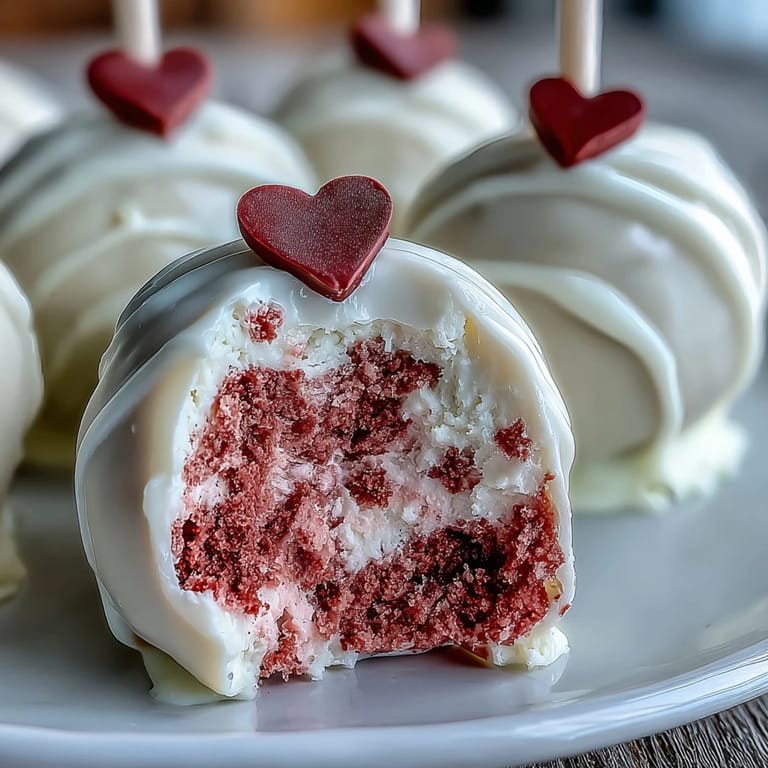
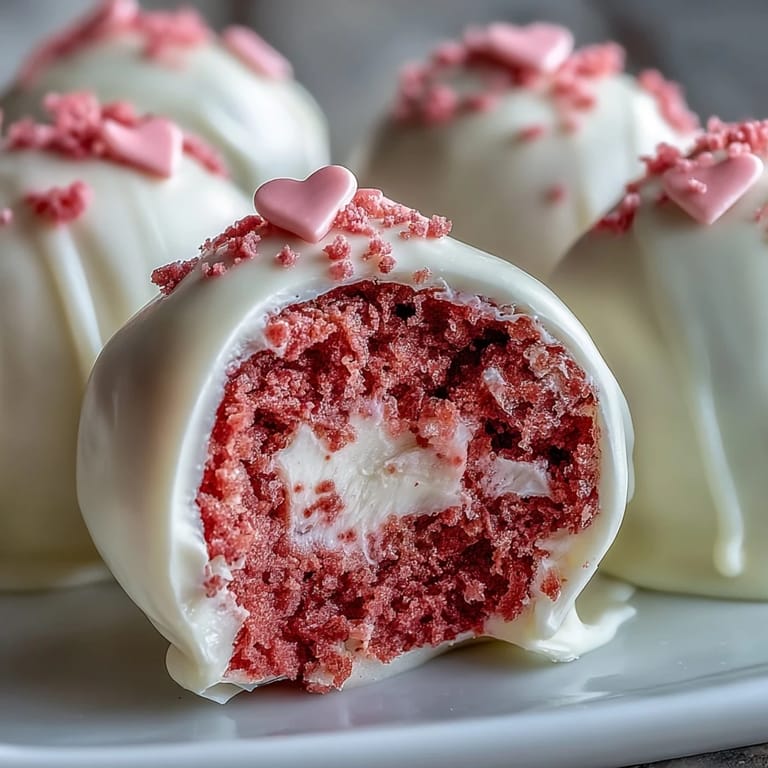
Save My sister texted me a photo of pink velvet cake pops from some fancy bakery, and I could practically taste the cream cheese frosting through the screen. That afternoon, I decided to make them myself, and what started as a casual weekend project turned into something I couldn't stop thinking about, those delicate pink spheres dipped in white chocolate sitting like little edible jewels on my kitchen counter. Now whenever I make them, the whole house smells like cocoa and butter, and somehow they've become my go-to gift for anyone celebrating anything worth celebrating.
I brought a batch to my coworker's birthday, and watching everyone's faces light up when they bit into the soft cake and tangy frosting reminded me why I love making these so much. One person actually asked if I'd started a business, which felt incredible, and that same person is now my regular cake pop customer (though I only charge them in friendship and compliments).
Ingredients
- All-purpose flour: The base of your cake, and using the right amount makes the difference between dense and tender, so don't skip the measuring cup.
- Granulated sugar: This feeds the sweetness, but the real magic happens when you balance it with the tangy cream cheese frosting.
- Unsweetened cocoa powder: Just enough to give the cake depth and that classic velvet cake color without overpowering the pink.
- Baking soda: Works with the vinegar to activate and lift the cake, creating that pillowy crumb.
- Buttermilk: Keep it at room temperature, trust me, because cold buttermilk can cause lumpy batter and nobody wants that.
- Unsalted butter: Room temperature is non-negotiable here, since cold butter won't cream properly with the sugar.
- Eggs: Also room temperature, adding them one at a time prevents the batter from looking curdled and angry.
- Vanilla extract: A teaspoon sounds small until you realize it's what makes the cake taste like comfort.
- White vinegar: This isn't about flavor, it's about chemistry, reacting with the baking soda to give your cake its lift.
- Pink gel food coloring: Gel holds color better than liquid, and you'll need less of it, so the pink actually stays vibrant after baking.
- Cream cheese: Softened, because cold cream cheese won't blend smoothly with the butter, and you'll end up with lumpy frosting that frustrates you mid-frosting.
- Powdered sugar: Sift it first, I learned this the hard way after lumpy frosting disasters, and it makes everything smoother.
- White chocolate or candy melts: Melts are more reliable than real white chocolate because they don't seize up as easily, which is your friend when you're dipping multiple pops.
- Cake pop sticks: Get the ones that are slightly angled at the tip, they insert into the balls much easier than the straight ones.
Tired of Takeout? 🥡
Get 10 meals you can make faster than delivery arrives. Seriously.
One email. No spam. Unsubscribe anytime.
Instructions
- Prepare your space:
- Preheat the oven to 350°F and grease that 8-inch square pan really well, then line it with parchment paper so your cooled cake doesn't stick and tear when you're crumbling it. This step feels small but saves so much frustration later.
- Whisk the dry team:
- In a medium bowl, combine flour, sugar, cocoa powder, baking soda, and salt, whisking them together so everything is evenly distributed. I like to whisk this by hand because you can feel the cocoa powder breaking up into tiny specks.
- Cream the butter base:
- Beat softened butter until it looks pale and fluffy, which takes about 2 minutes with an electric mixer. This creaming process is what traps air in your cake, making it light instead of dense.
- Add the eggs slowly:
- Add one egg at a time, beating well after each one, then stir in vanilla and vinegar. If you dump all the eggs in at once, your batter might break and look separated, which isn't ideal.
- Alternate wet and dry:
- Add the flour mixture and buttermilk in alternating batches, starting and ending with flour, stirring just until combined. Overmixing develops gluten and makes the cake tough, so stop as soon as you don't see white streaks.
- Add the pink:
- This is the fun part, squeeze in 1 to 2 teaspoons of pink gel coloring and stir until the color is vibrant and evenly distributed. If you want it deeper pink, add more coloring now since baking can lighten it slightly.
- Bake with confidence:
- Pour the batter into your prepared pan and slide it into the oven for 22 to 25 minutes, until a toothpick inserted in the center comes out clean. The kitchen starts smelling amazing around minute 20, which is your cue to pay attention.
- Cool completely:
- Let the cake cool in the pan for about 10 minutes, then turn it out onto a wire rack and let it come to room temperature. Warm cake turns to mush when you crumble it, so patience here matters.
- Make the frosting:
- Beat softened cream cheese and butter together until smooth, then gradually add sifted powdered sugar and vanilla, beating until fluffy and light. This takes maybe 3 to 4 minutes, and you'll know it's ready when it looks like pale clouds.
- Crumble and combine:
- Break the completely cooled cake into crumbs in a large bowl, then add the frosting and mix with a fork or your hands until the mixture holds together when you press it. It should look like damp sand that's sticky enough to hold a ball shape.
- Roll into balls:
- Use your hands or a small cookie scoop to roll the mixture into 24 balls about the size of walnuts, placing them on a parchment-lined baking sheet. Getting them roughly the same size means they'll cook and set at the same speed.
- Chill the first time:
- Pop the baking sheet into the fridge for at least 30 minutes so the balls firm up and won't fall apart when you dip them. I've made the mistake of skipping this, and it results in cake pop chaos.
- Melt the chocolate:
- Microwave the white chocolate or candy melts in a microwave-safe bowl in 20-second bursts, stirring between each one, until it's completely smooth. Overheating white chocolate makes it seize and become grainy, so low and slow is the way.
- Insert the sticks:
- Dip the tip of each cake pop stick into the melted chocolate, then insert it about halfway into each chilled ball. The chocolate acts like glue, so waiting a few seconds lets it set before you dip.
- Chill again:
- Put the stick-inserted pops back in the fridge for 10 more minutes so the sticks are really secure and won't pop out mid-dip. This second chill is the difference between smooth sailing and disaster.
- Dip with flair:
- Hold each pop by the stick and dip it into the melted chocolate, giving it a gentle twist and letting excess drip back into the bowl. Tapping the stick gently on the rim of the bowl helps the chocolate coat cleanly without dripping everywhere.
- Decorate immediately:
- While the chocolate coating is still wet, sprinkle on whatever toppings you chose, whether that's sprinkles, edible glitter, or tiny heart candies. Once the chocolate sets, the toppings won't stick.
- Set them upright:
- Place each finished pop upright in a styrofoam block or cake pop stand and let them set at room temperature for about an hour. This prevents flat spots and lets the coating harden into that satisfying shell.
 Save
Save There's something magical about handing someone a cake pop and watching them bite into it, that moment when they realize it's not just chocolate on the outside but actual cake and frosting inside. A friend once told me these made her feel celebrated even though it was just a Tuesday, and that's when I realized these little pops are really just edible kindness.
Storage and Keeping
Keep your finished cake pops in an airtight container in the refrigerator, where they'll stay fresh and delicious for up to 5 days. The frosting sets up nicely in the cold, and they actually taste a bit richer when they're chilled.
Flavor Variations to Explore
Once you've mastered the basic pink velvet, you can venture into different melting chocolate varieties or even layer the frosting with strawberry puree for extra tang. Dark chocolate melts give these a sophisticated edge, while strawberry candy melts make them taste like a fancy strawberry shortcake in bite form.
Making These Ahead and Party Planning
The best part about cake pops is that you can make them several days ahead, which takes so much pressure off party day when you're already thinking about a hundred other things. I usually make mine the day before and keep them in the fridge until an hour before guests arrive, then set them out so they look impressive without last-minute stress.
- Bake the cake and prepare the frosting the day before, then crumble and combine everything the next morning.
- Roll the balls and chill them overnight, making the dipping process faster and smoother on party day.
- You can even dip and decorate them completely a few hours ahead, just keep them chilled until serving time.
 Save
Save These pink velvet cake pops are proof that homemade treats don't need to be complicated to feel special, and every time you make them, you're giving people edible joy. Share them generously and watch how something this small can brighten someone's entire day.
Recipe FAQ
- → How do I achieve a vibrant pink color in the cake?
Use 1–2 teaspoons of pink gel food coloring in the batter, mixing thoroughly until the color is even and vibrant.
- → Can I use different coatings instead of white chocolate?
Yes, dark chocolate or flavored candy melts like strawberry can be used for varied tastes and colors.
- → What’s the best way to keep cake pops fresh?
Store them in an airtight container in the refrigerator for up to five days to maintain freshness and texture.
- → How do I prevent the cake pops from falling off the sticks?
Dip each stick tip into melted chocolate before inserting it into the cake ball, then chill to secure the connection.
- → Can these be prepared in advance?
Yes, cake balls can be prepared and chilled ahead of time before coating and decorating to save time.